Category Archives: Wine & Food

Super Bowl Repeat — Carolina-style Mustard Barbecue Hash


Why am I repeating this recipe?  Simple.  I lied on Tuesday about brisket sandwiches being the best way to graze while watching the Super Bowl.  There’s an even better way to graze through all those Super Bowl food commercials.  It’s Carolina-style mustard barbecue hash piled high inside a toasted hamburger bun.

Well, I must say that looking at my blog hit counter, it appears barbecue in general and smoked pork shoulder in particular are very popular indeed.  Last Wednesday I shared with you the secret to perfectly smoked barbecue Boston butt (pork shoulder).  I also told you that I would give a recipe for that second shoulder that we still have left over after serving up the first.  This recipe is super simple, irresistibly delicious, and incredibly addictive.  I’ve had people who attended one of my barbecues almost a decade back remark how much they miss the taste of this dish.

Smoked Boston Butt (pork shoulder)

Smoked Boston Butt (pork shoulder)

What we’re going to make today is Carolina-style mustard barbecue hash — a cousin to the pulled pork that’s slathered in tomato-based barbecue sauce but instead using a tasty sauce that enhances the delicate smoked flavor of a perfectly smoked shoulder rather than disguising it beyond all recognition.  Let’s face it:  if you’re going to take your perfectly smoked shoulder and drown it in traditional barbecue sauce, then you might just have well slow-cooked that pork shoulder in the oven.

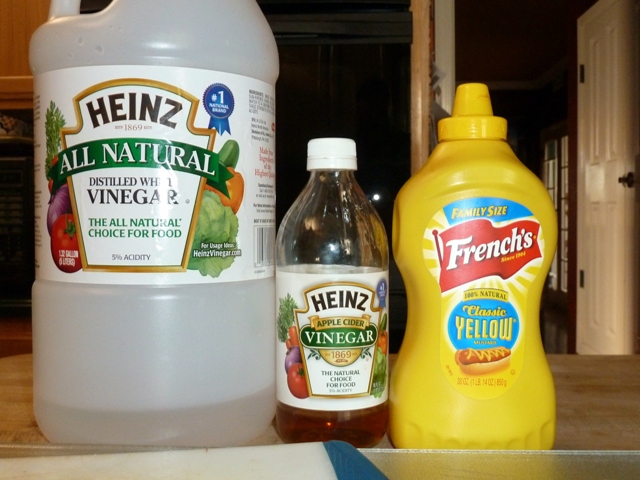
What you’ll need for the sauce:

Sauce ingredients:  Apple Cider or Distilled White Vinegar and Yellow Mustard

Sauce ingredients: Apple Cider or Distilled White Vinegar and Yellow Mustard

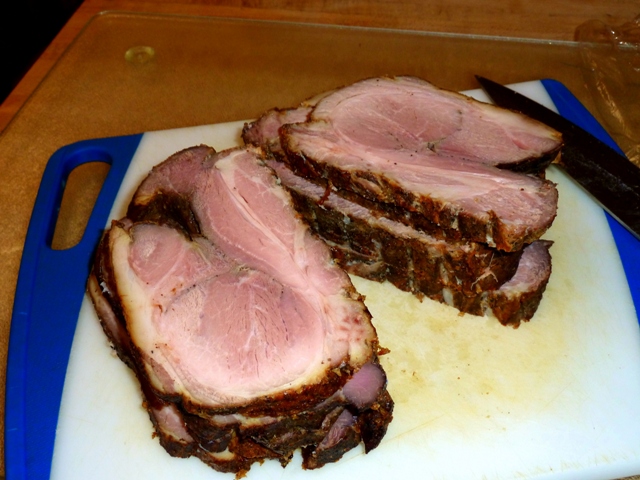
First, take your leftover butt and slice it into ¼ to ½ thick slabs

Half-inch-thick slices

Half-inch-thick slices

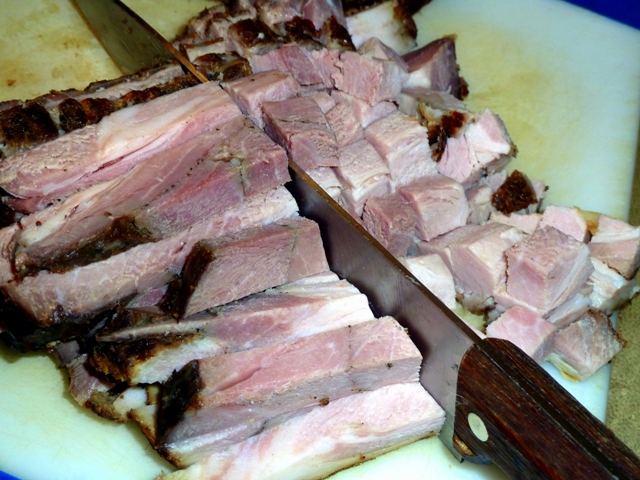
Cut those slabs lengthwise into thick strips, then into cubes.

Slices cut into strips, then cubed

Slices cut into strips, then cubed

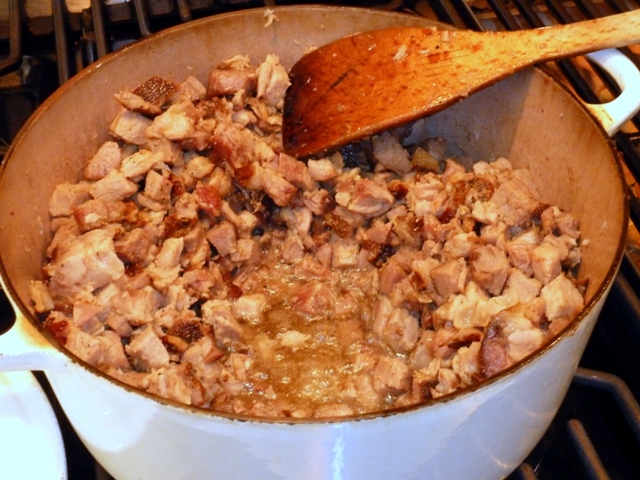
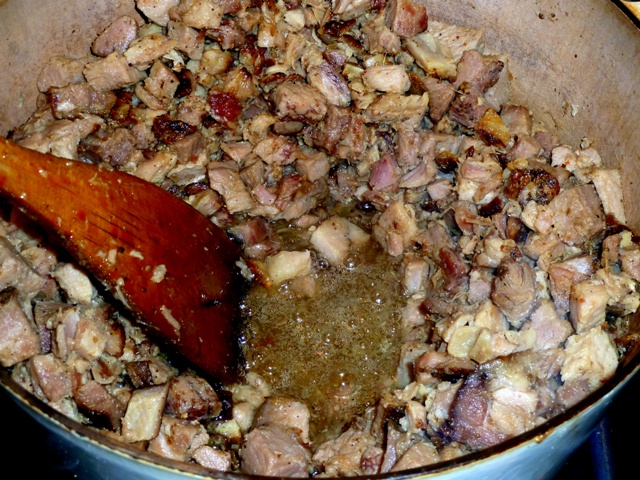
Sautée the pork cubes until you’ve rendered out much of the fat (about thirty to forty-five minutes).

Render out most of the fat

Render out most of the fat

Once the fat pools nicely in the bottom of the pan, drain it off.

When the fat pools in the bottom, drain it

When the fat pools in the bottom, drain it

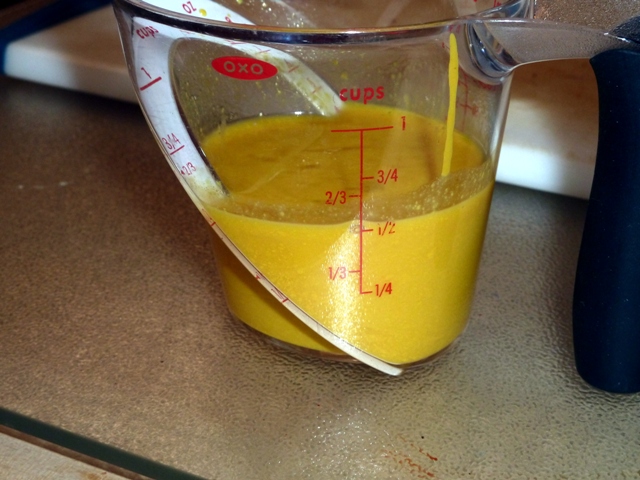
While the pork drains, mix together equal amounts of yellow mustard and either distilled white vinegar or apple cider vinegar.  Go easy here.  You can always add more.  You cannot, however, remove too much vinegar and mustard from the pork once it’s in there.  If you get it too tart, you’ve blown the dish (and destroyed your delicious smoked pork).

Mix together equal parts vinegar and mustard (but don't overdo it)

Mix together equal parts vinegar and mustard (but don’t overdo it)

Mustard/Vinegar Blend

Mustard/Vinegar Blend

Pour your mustard/vinegar blend into the now fat-drained pork cubes.  Add water and simmer covered for at least thirty minutes, stirring frequently to avoid scortching and adding more water as necessary if it starts to dry out.

Mustard/Vinegar Blend goes into Pork Cubes; add water as well

Mustard/Vinegar Blend goes into Pork Cubes; add water as well

The cubes will begin to break apart into a hash-like consistency.  Don’t overdo it, however.  You still want some cube-like texture for interest and as little bursts of smokey flavor.

Simmer, adding water as necessary.

Simmer, adding water as necessary

The completed dish should be only slightly tangy, with neither mustard nor vinegar overpowering the pork and its delicate smokey flavor.  Traditionally, this is served over buttered long-grain rice, but it also works very well on toasted hamburger buns in a unique take on the ubiquitous (but vastly inferior) pulled pork sandwich.

Serve over buttered long-grain rice or on toasted hamburger buns

Serve over buttered long-grain rice or on toasted hamburger buns


1 Comment

Filed under R. Doug Wicker, recipe, Wine & Food

Super Bowl Repeat — Jalapeño Pesto Dip


And just in time for the Super Bowl, that perennial favorite I post every year about this time — my world-famous Jalapeño Pesto Dip as well as Lipton’s even more famous California Onion Dip.

The great things about this recipe are:

  • It’s healthy as all get out.
  • It’s so tasty you’ll completely forget how healthy it is.
  • It’s not as spicy hot as it sounds (although it’s definitely not for the timid of tongue, either).
  • It goes great with anything from tortilla chips to corn chips to potato chips to even pretzels.
  • It’s so simple to make even a husband can do it.
  • The leftover jalapeño pesto is great on a whole variety of dishes ranging from omelets to burgers (use as a topping)  and even mixed with ground beef for tacos or chili.  By all means use your imagination with the leftover pesto, because you’ll probably think up dozens of uses for it.

Ingredients:

  • 2 pounds fresh whole  jalapeño peppers
  • 2 tsp. ground cumin
  • 1 tsp. granulated or 2 tsp. fresh crushed garlic
  • 1 tsp. sea salt
  • ⅓ cup good extra virgin olive oil, avocado oil, or other healthy monounsaturated oil

Step 1. Bring to boil just enough water to immerse the jalapeños.  Once the water is boiling, add the jalapeños and bring the water back to boiling.  Gently boil the jalapeños, stirring occasionally, for fifteen minutes.  Drain the jalapeños and set aside until they are cool enough to handle.

Step 2. Slice the jalapeños in half lengthwise and remove the stems.  Now, this next procedure is where you control the heat to some extent.  On most of the jalapeños, remove the seeds and the ribs to which those seeds are attached.  Keep the seeds and ribs on approximately one-third of the jalapeños, choosing in particular those jalapeños with very white, healthy-looking seeds and discarding those seeds that are dingy or brown in color.  Increasing the number of seeds and ribs retained will increase the heat; decreasing that number will help to tame it.

Step 3. Place the jalapeños, cumin, garlic, and salt into a food processor.  While pulsing, slowly drizzle in the olive oil.  Do no overdo the processing or you’ll destroy those beautiful white seeds and lose texture, but you do want a fairly smooth consistency.

Serve with either warm or cold with your favorite chips. Warm is particularly interesting, especially if you contrast that with a well-refrigerated California onion dip (one envelope of Lipton’s Onion Soup Mix combined with one pint of reduced-fat sour cream).  Serve these two dips side-by-side and watch eager fans alternate between the two of them.

Alternately, stir into the California Onion Dip some of my Jalapeño Pesto Dip to add zip to the former while taming the latter.  It’s quite a delicious combination.

And since this is listed under Wine & Food the next question would have to be, what kind of wine would you serve with this?  Well, first of all, this is definitely an accompaniment to beer, especially a good, fairly strong ale.  But if you would like wine with this, it’ll have to be one that helps tame the fire.  That suggests a semisweet white.  Think:  Johannisberg or German Rieslings, Chenin Blanc, or Gewürztraminer.  The cooler white wine serving temperatures supply immediate relief and the sweetness helps neutralize the capsaicin (the compound that gives peppers their “heat”) in the long term.

1 Comment

Filed under R. Doug Wicker, recipe, Wine & Food

Super Bowl Repeat — Smoked Brisket


Why am I repeating this recipe?  Simple.  When watching the Super Bowl what better way to graze than on smoked brisket smothered in barbecue sauce and then stacked high inside a hamburger bun?

Apparently there are a lot of people out there who are interested in the art of smoking meats, if my hits for Smoked Boston Butt and Mustard-Based Barbecue Hash are any indications.  Today, I’ll teach you the secrets behind irresistibly delectable smoked brisket.

Brisket is probably the most challenging barbecue subject you’ll find.  In it’s normal state a brisket is tough, fatty, not very flavorful.  In short, it needs help.  A lot of help.  That help arrives in the form of slow, slow roasting at low, low temperatures, the tangy caress of hardwood smoke, and a flavorful rub consisting of a carefully balanced blend of complimentary seasonings.  But this truly is a long-term project requiring about 1 ½ to 2 hours of smoking for every pound of meat, or around eighteen hours for a typical nine-pound brisket.

The first secret is that you want an untrimmed brisket.  Brisket is by nature a very tough piece of meat, and you’re going to need the fat of an untrimmed one to both tenderize it and to transfer deeply into the meat the flavors of the rub you put on it, and the delicate smokey flavor imparted by your smoker.  Just trim away a little of the fat cap — down to around a quarter- to half-inch thick along the top of the brisket.

Untrimmed Brisket with some of the fat cap removed

Untrimmed Brisket with some of the fat cap removed

Next comes the rub.  You’ll find a lot of different rub recipes on the internet, but this one is neither overpowering nor does it conflict with the delicate smoke of the barbecue pit.  It consists of equal measures of just five ingredients:

All You Need for Rub

Homemade Rub Ingredients

Homemade Rub ingredients:

  • Brown sugar
  • Kosher salt (halve the amount if using fine-grain or table salt)
  • Freshly ground black pepper
  • A high-quality paprika
  • A good, unadulterated chili powder (preferably a New Mexico mild red); by “unadulterated,” I mean nothing added to the chili powder whatsoever

Mix together the rub ingredients.  Sprinkle a generous portion of the rub onto the entire exterior of the brisket.  Work the rub into the meat.  Sprinkle on more rub, and then tightly encase the entire seasoned brisket in plastic wrap.  Refrigerate the seasoned brisket for at least twenty-four hours.

The Rubbed Meat

The Rubbed Meat

Wrapped and Refrigerated for at least 24 hours

Wrapped and Refrigerated for at least 24 hours

Prepare your smoker as we did for Smoked Boston Butt, filing the water tray and placing either hardwood chunks or water soaked hardwood chips into the smoke box.  Good wood choices here include hickory, oak, and pecan, or a combination of any or all of those woods.  Mesquite can be used, but sparingly.  If you like the flavor of mesquite, make sure you dilute that sharp mesquite tang by using two to three parts of the other listed wood for every part of mesquite or you’ll run the danger of overpowering the meat and imparting to the brisket a bitter, over-smoked taste.

Adding Water to the Smoker Water Tray

Loading in the Soaked Wood Chips

Just before you go to bed on the night before your brisket dinner, place your brisket into the smoker and adjust the temperature to 215°  Fahrenheit (102° Celsius).  Check water and wood smoke levels about every three hours (And you thought this was going to be easy?  No way!  Get out of bed and check that smoker!).  The next morning you can now forgo adding any more wood.  By now the smoke has done all it’s going to do for the flavoring of the brisket.  From this point on you’re now concentrating on liquifying the internal fat so that it carries the rub and the smoke flavor from the outer layers of the brisket deep into the meat.

Into the Smoker

Into the Smoker

As with Boston butt, the internal temperature for which we are shooting is 185° (85º C) or higher, as we want the internal temperature to continue to rise to 190° (88° C) after the brisket is removed from the smoker and resting.  At the sixteen-hour mark we can safely speed up this process because by now the internal fat should be liquified.  Make sure the water tray is topped off and crank up the smoker heat to around 250° (120° C).  Some people advocate tightly wrapping their brisket in heavy-duty aluminum foil during the latter stages and placing it back into the smoker to finish off.  Don’t do it!  Have you ever seen what happens to aluminum foil when it comes into contact with salt for any length of time?  Yuck.  No way I want that black oxidized aluminum embedded onto my brisket, and neither should you.  If these foil advocates are getting dry brisket, it’s because they’re not properly maintaining the humidity levels inside the smoker via that water tray.

Almost Done — Time to Finish in the Smoker or Oven

Almost Done — Time to Finish in the Smoker or Oven

Another method to speed things along is to take out the brisket, place it on a wire rack into a roasting pan containing a little water (just enough to keep it humid — about half a cup should do), carefully tent the pan with heavy duty foil while making sure that the foil does not touch the meat, and then tightly sealing the foil around the edges of the roasting pan.  Place the roasting pan into the kitchen oven and roast the brisket at between 250° to 275° (120° to 135° C) for about one to two hours.

Brisket Tent Coming out of the Oven

Brisket Tent Coming out of the Oven

After you hit that magic internal temperature number, remove the brisket from the smoker or oven and allow it to rest for at least half an hour.  As we did with that Boston butt, we’re allowing the flavorful fats to once again congeal and lock in the moisture inside the brisket.  Carved too soon, that fat and moisture will ooze out and leave you with a dry brisket. And, yes, there’s one more secret.  That would be the secret to carving the brisket.  You’ll notice two basic parts to your brisket.  On top of the brisket will be a fattier meat with the grain of the meat running at a diagonal to the length of the brisket.  Below that will be a leaner portion in which the grain runs in a slightly different direction.  Slice into the brisket horizontally to remove the fatty portion and set that off to the side (the added fat makes this the logical portion to save as leftovers, or to carve last if you’re feeding a mob).  Now, using a long and very sharp kitchen knife (under consideration for banning in the U.K. since the gun ban didn’t quell violent crime there), slice the brisket directly across the grain for maximum tenderness.  Slices should be at least a third of an inch thick — too thin and the slices will fall apart; too thick and they may be a bit chewy.

The Final Product

The Final Product

Wine selection:  Again, this is barbecue.  Australian Shiraz is a natural.  But it’s also beef, so other nice pairings include a Bordeaux-style blend heavy on the Cabernet Sauvignon grape; an aged, dark red California Zinfandel; or even an Australian GSM or the French equivalent Châteauneuf-du-Pape.

1 Comment

Filed under R. Doug Wicker, recipe, Wine & Food