Tag Archives: recipe

Bonus Holidays Recipe Article: Roasting Chestnuts


Hot, freshly roasted chestnuts with a little butter

Yep, it’s late fall. Chestnuts are showing up at the local grocers’ or, in our case, the local Whole Foods. And pricy though they may be, roasting these little gems at home is a heck of a lot cheaper than flying to Europe to get a paper sack full of chestnuts from a street vendor. Besides, if you can find good, fresh chestnuts, it’s simply too easy to do these at home, and in very little time. So, let’s get started with this step-by-step recipe beginning with a list of what you’ll need, directions on how to use what you’ll need, and how to serve these delightful morsels of goodness.

Here’s what you’ll need:

  • Approximately 30 chestnuts for two people; about 1.1 pounds/500 grams
  • An oven heated to 425ºF/220ºC
  • A very sharp serrated knife
  • A cutting board that can handle a very sharp serrated knife
  • Gauze, tape, alcohol, and perhaps an extra finger or two should you slip with that very sharp serrated knife
  • A pot with some water
  • A baking tray
  • A clean kitchen towel
  • Butter, preferably unsalted, for garnish

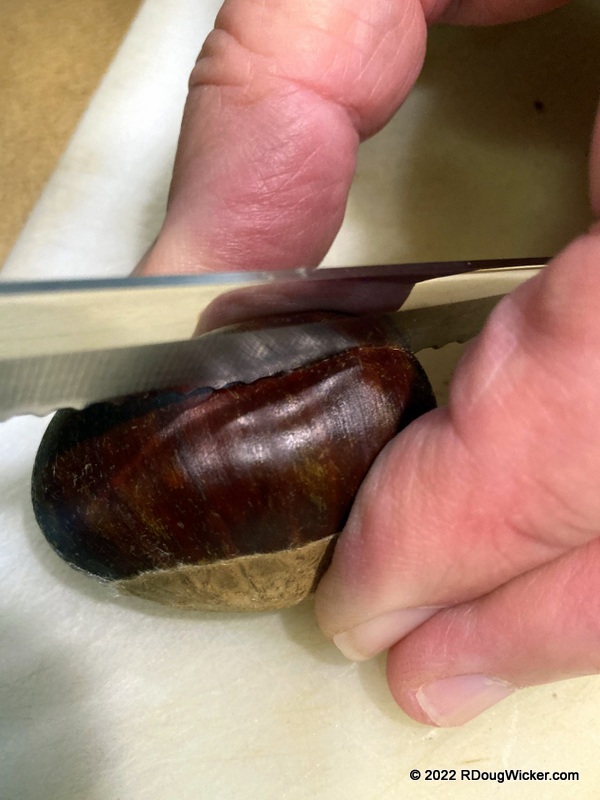
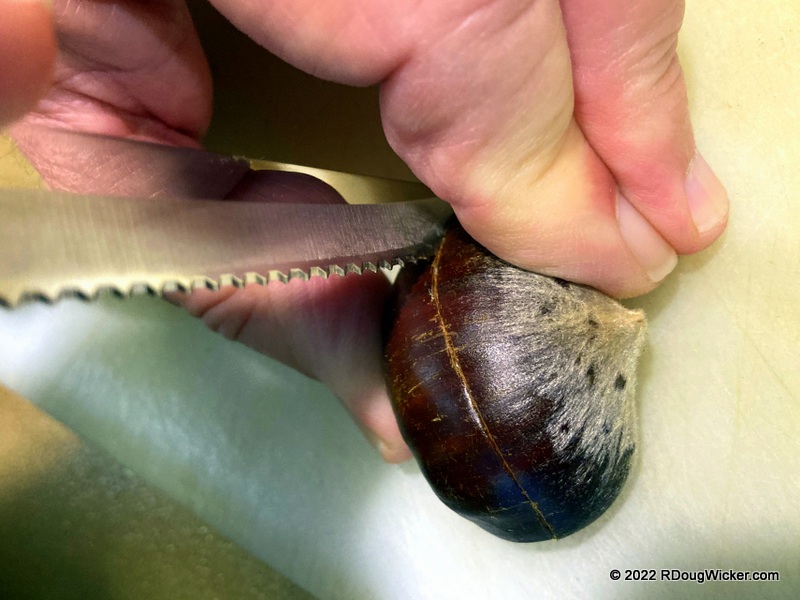
First off, forget all that stuff you’ve read about cutting an X across the top of the chestnut. That technique doesn’t work very well later when you want to pop out the nut from the shell. I’m going to show you a better way.

Chestnuts, cutting board, and a very sharp serrated knife

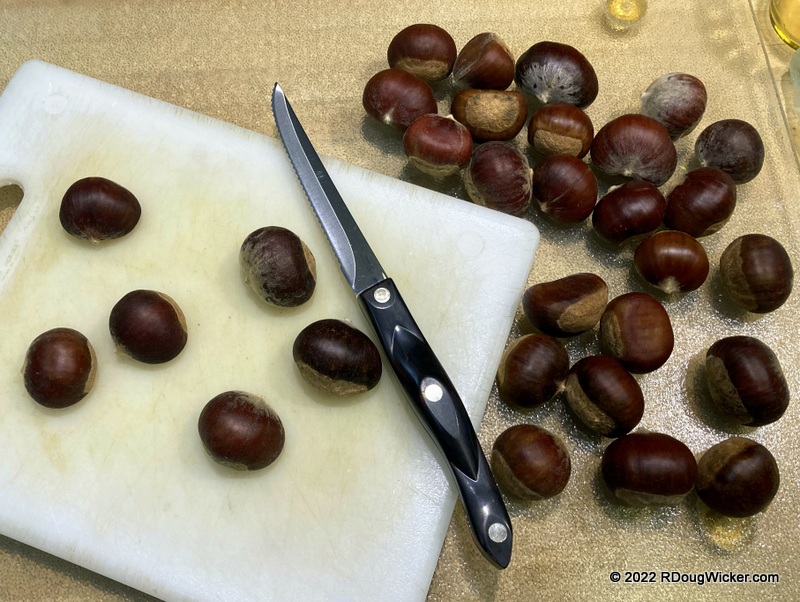
Lay the chestnut flat side down, round side up. Take your knife and, along one edge, made a shallow cut through the shell. Don’t worry if you cut slightly into the nut.

Cut along one side of the chestnut

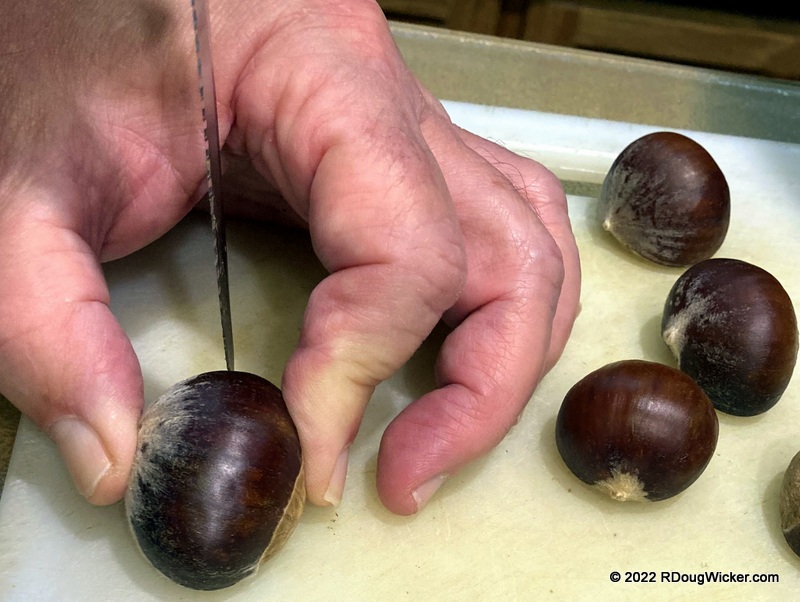
Continue scoring across the top of the chestnut. You may want to rotate the nut and begin from the other side, but that may not be necessary.

Keep going!
Rotate the chestnut and continue cutting all the way across the top (rounded portion) of the chestnut

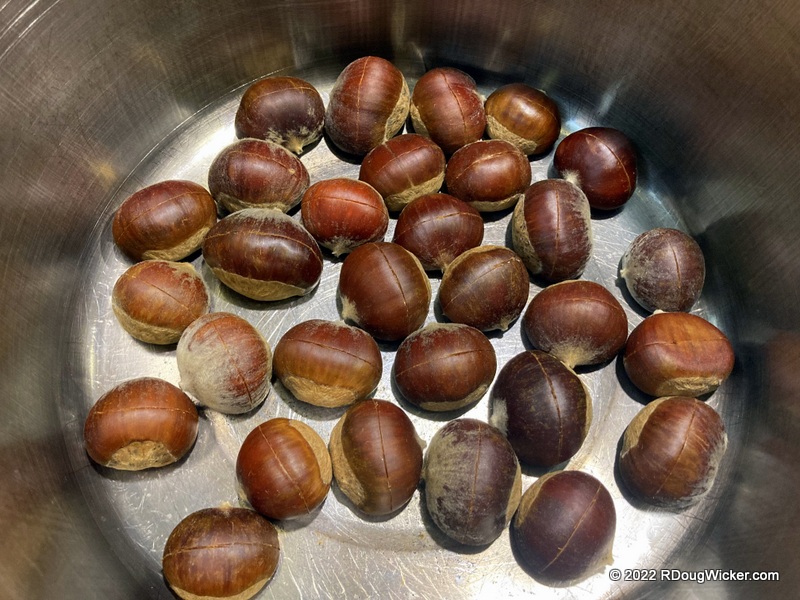
Now repeat the process with all the chestnuts. When you’re done, place the scored chestnuts into a pot and add just enough water to cover them.

Add water to just cover the scored chestnuts

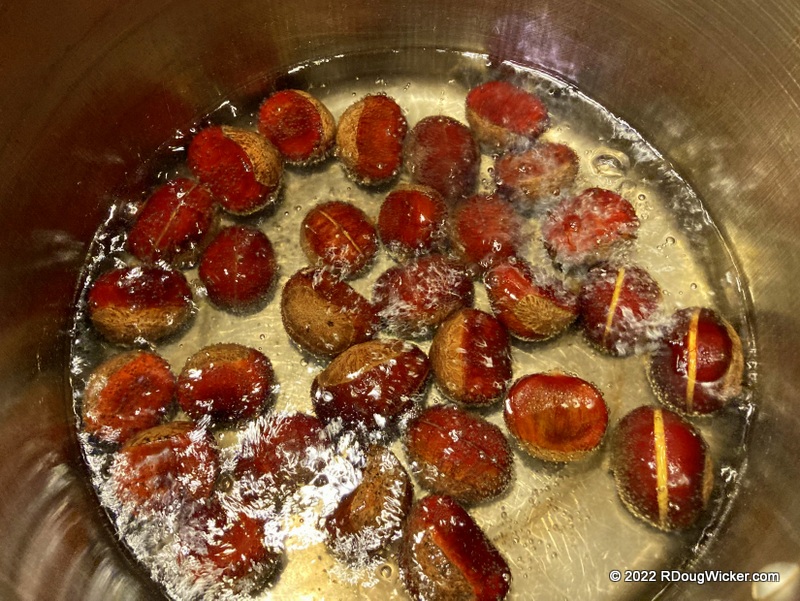
Put the pot on the stove and turn up the heat. You want to remove those chestnuts just as the water begins to boil. Most will have begun to open along the cut you made earlier.

Bring just to a boil, then immediately remove the chestnuts from the water

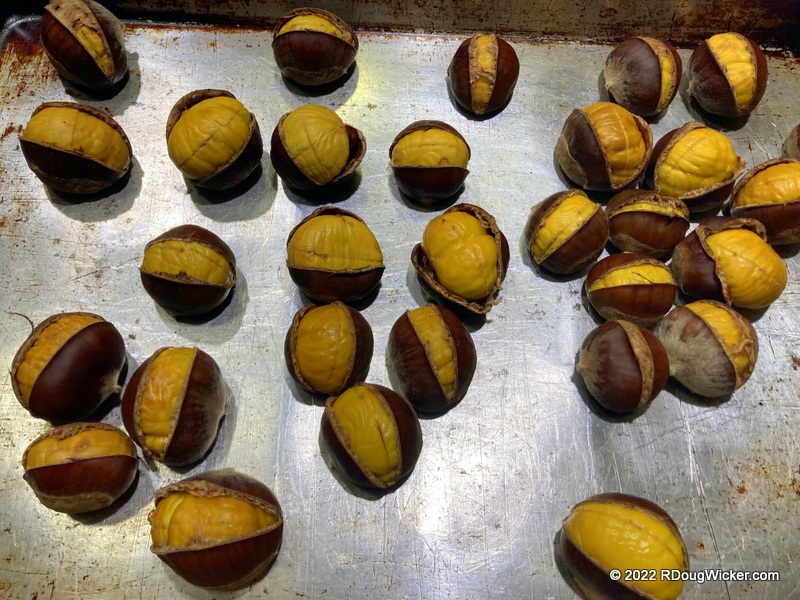
Spread the chestnuts, scored side up, onto the baking tray. Leave room around the individual nuts.

Spread the chestnuts out onto a baking tray

Place the chestnuts into your preheated 425ºF/220ºC oven and roast them for twenty minutes (English) or for 20 minutes (metric). In my case, I used my oven’s convection mode, but that’s not necessary.

425ºF/220ºC oven for either twenty minutes (English) or 20 minutes (metric)

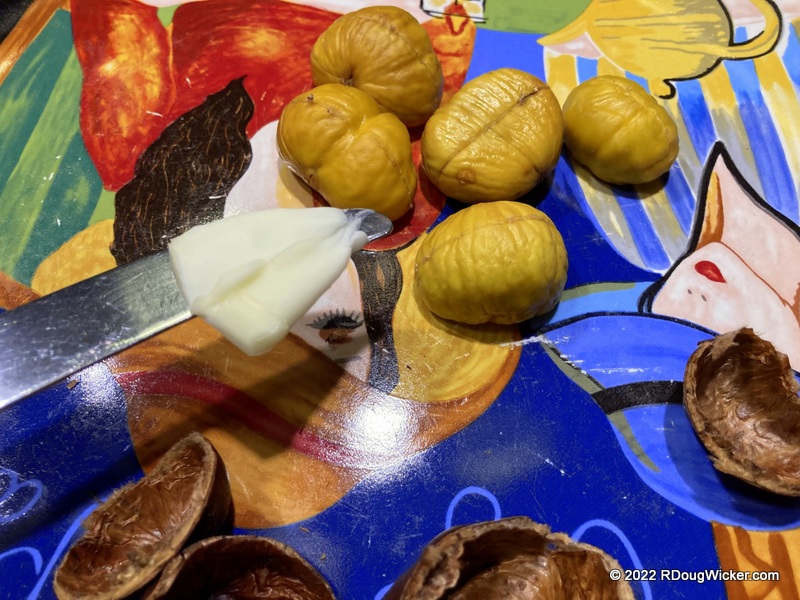
Here’s how your chestnuts should look when you remove them from the oven:

Roasted chestnuts, but we’re not yet done!

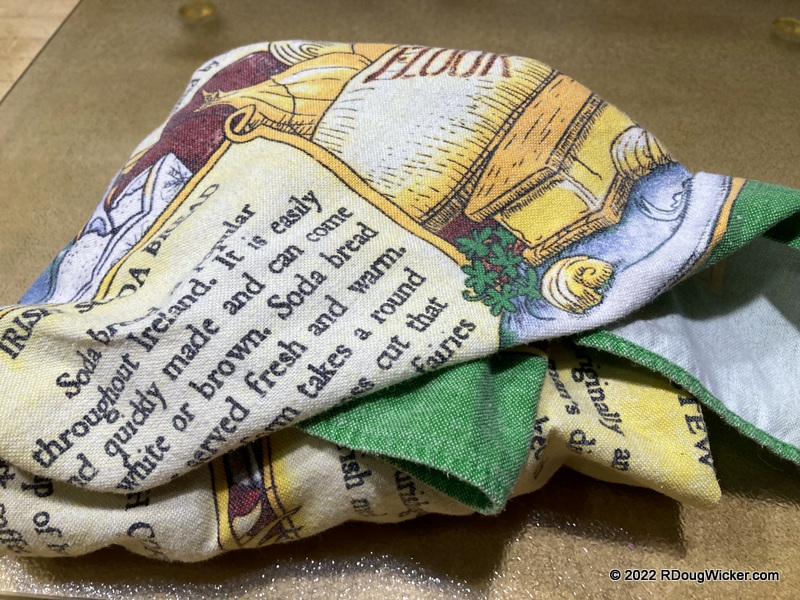
Don’t get grabby! We’re not yet done. Remember that dish towel from the list above? Now is when that comes into play.

Place the roasted chestnuts onto the kitchen towel

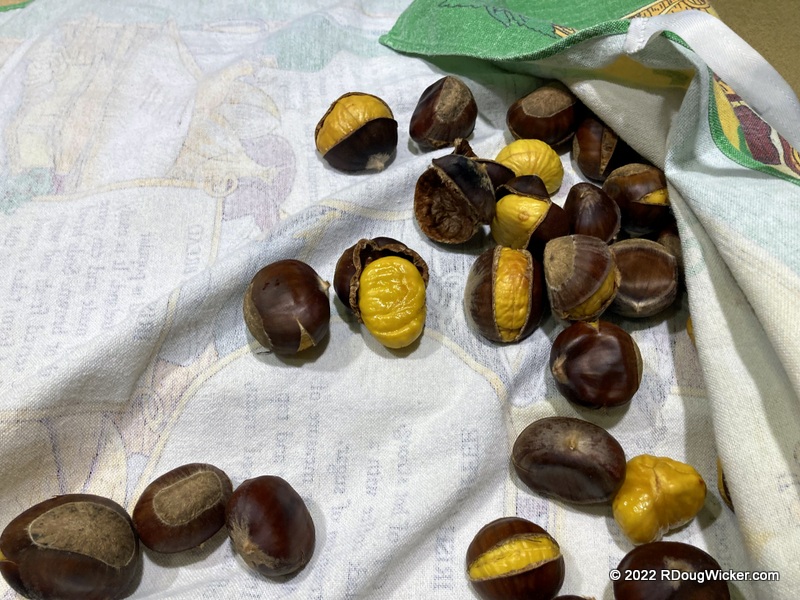
Place the chestnuts onto your kitchen towel, then fold the towel over to trap the heat. Leave those nuts alone for another ten minutes (English) or 10 minutes (metric).

Hot chestnuts resting in a kitchen towel

Time’s UP! Unwrap those chestnuts!

Time to dig in!

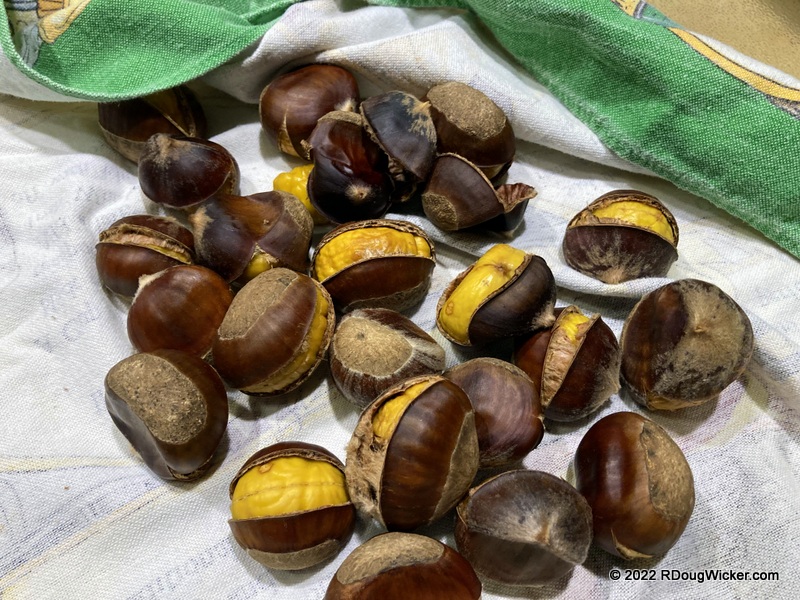
Now, plate a few nuts and, while you’re enjoying those, rewrap the remainder to keep warm. On an unrelated note, do you know what one calls leftover lettuce? The romainder.

Freshly roasted chestnuts practically jumping from their shells on their own

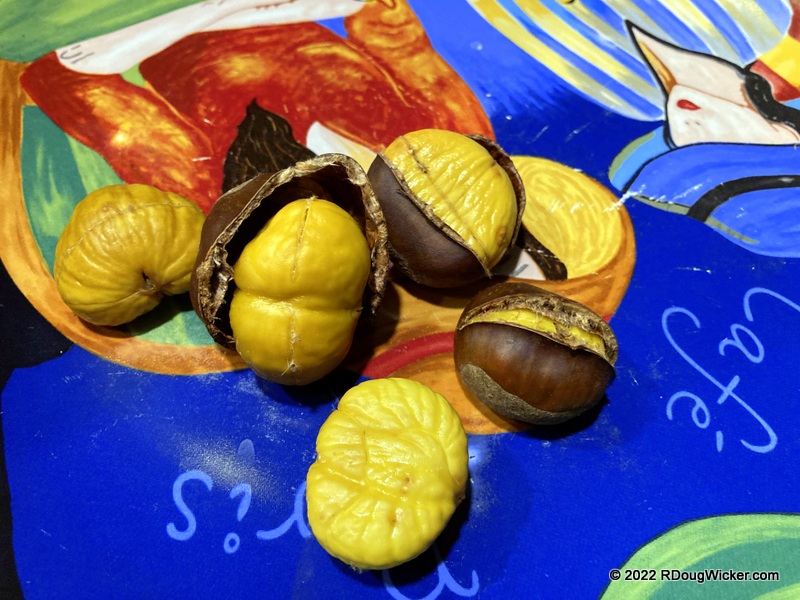
Don’t forget to put a little butter on these delicacies. We prefer cold butter, which is easy to dab onto the chestnuts. The butter then warms up and begins to spread as you prepare to pop a nut into your drooling Pavlovian mouth.

YUM!

If you’re wondering why I put this article together and posted it on an irregular day (a Tuesday rather than my usual Mondays, Wednesdays, and Fridays), that’s because time is of the essence. Chestnuts are just hitting the markets here locally, and they won’t in most likelihood be there a month from now. If they are, they’ll be way past their prime; you’ll wind up throwing out quite a few if you wait that long. So, hurry on out there and stock up. Get a few pounds/kilo or two and store in the refrigerator those chestnuts you won’t be roasting today. I’ve found they stay fresh much longer when kept cold.

Feel free to leave a note on how this recipe worked out for you!

Слава Україні! (Slava Ukraini!)

Advertisement

Comments Off on Bonus Holidays Recipe Article: Roasting Chestnuts

Filed under R. Doug Wicker, recipe, Wine & Food

Fun Food Friday — Piroshki (Russian: Pirozhki)


Piroshki with creamy garlic mushroom gravy

It’s time for my version of Russian piroshki, which I introduced to you on Wednesday’s visit to the Aragosta restaurant in St. Petersburg. While the Aragosta version of piroshki may be truer to the traditional, both Ursula and I think this recipe gives a superior tasting dish.

This is based on a recipe I’ve been making since my mid-teens. I picked it up from one of my mother’s cookbooks, and to this day I still recall how to make it from memory, with some personalization over the years and along the way. But today I’m writing it all down just for you. And best of all, this one is actually easier than the traditional, single-serving piroshkis, as it makes one large meat pie that’s easily cut into individual servings. So, here goes:

Piroshki dough ingredients

Dough Ingredients:

  • 1 stick of butter (4 oz.), room temperature
  • 1 egg, room temperature
  • 1 pound sour cream (I use light), room temperature
  • 2 tsp. salt
  • 5 to 5½ cups flour

Piroshki filling indredients

Meat filling Ingredients:

  • 3 to 4 pounds lean ground beef
  • 1½ tsp. granulated garlic (or several cloves of minced fresh garlic)
  • 2 medium yellow onions, finely chopped
  • Olive oil (for browning onion and meat)
  • Salt, to taste
  • Freshly ground black pepper, to taste

Piroshki “gravy” ingredients

“Gravy” Ingredients:

  • Condensed cream of mushroom soup with roasted garlic
  • Milk

Dough:

  • In a large mixing bowl, mash with a fork the softened butter. Mix in the room temperature egg, sour cream, and salt and stir together until the butter is in small, curd-like pieces.

Mix together sour cream, eggs, butter, and salt

  • Stir in flour one cup at a time, fully incorporating the flour into the mixture with each addition.

Work in the flour

  • Don’t fear overworking this dough, as piroshki should not be your typical ‘flaky’ crust. It should have a smooth, almost clay-like consistency that, after baking, has a chewiness to it. If after the fifth cup of flour the dough still seems moist and slack, work in another half cup of so.

Piroshki ready to roll

Filling:

  • In a large Dutch oven or skillet, heat up some olive oil and sauté the finely chopped yellow onion until starting to brown.

Onion and olive oil

Slightly caramelized onion

  • Add the ground beef and cook thoroughly. Season with granulated (or fresh) garlic, and salt and pepper to taste.

Add the ground beef to the onion and season away

Assembly Step 1:

  • Preheat oven to 357° F/190° C.
  • Roll out the dough. You want a relatively thick crust, so don’t overdo it.

Roll out the dough

  • You want the final dough to extend far beyond the edges of your baking sheet, but using the measurements above you’ll have plenty with which to work. You’ll need this overlap later to fold over the filling.

Assembly Step 2:

  • Place the rolled out in a large baking sheet.

Ready for the filling

  • Pour it the meat filling.

Meat filling

  • Fold the dough over the filling, first by folding in the ends

Fold in the ends

  • And then overlapping with the sides.

Overlap the ends with the sides

  • Make several large vent holes in the top of the crust. Place the piroshki in the oven, and start making the gravy (see next).

Make vent holes

Gravy: In a sauce pan combine the condensed cream of mushroom soup with milk, using a ratio of ½ can of milk for each can of soup (two cans will make a lot of gravy, so you may want to start with one first, then make more later for the leftovers). Heat to a simmer while stirring, switch off, cover, and plan to reheat just before the piroshki comes out of the oven.

Creamy, earthy, garlicky mushroom gravy

Assembly Step 3:

  • When the crust nicely browned, around 40 minutes or so, your piroshki is done. Remove it from the oven and let it sit for about five minutes while you reheat the gravy.

Baked piroshki

  • Plate serving-sized portions and cover with a generous amount of gravy. Enjoy.

Mmmm, mmmm!

Now for a wine pairing: Piroshki is a hearty, meaty dish with a robust, earthy mushroom gravy. A creamy mushroom soup is usually paired with an oaky chardonnay, but here the mushroom is served as a condiment. Then there’s that wonderful, chewy crust made with sour cream, which seems to me to be a tough pairing, but I’m leaning once again toward chardonnay. However, it’s the seasoned beef filling that drives today’s choice. So, while a good compromise between these three flavors might normally be a pinot noir and would probably work very well, I’m going to bit bolder. With that in mind, I’m going to recommend in order of preference:

  1. A California Zinfandel
  2. Cabernet Franc
  3. An Argentine Malbec

A word about next week: This past Sunday I reran my Memorial Day article, but next Thursday is worthy of yet another commemoration. As such, I’ll be temporarily postponing a continuation of this series on the Baltic region. Instead, all next week starting Sunday I’ll be rerunning my six-part series on the D-Day Invasion of Normandy in recognition of the fact that next Thursday, the 6th of June, marks the 75th anniversary of this epic event.

Comments Off on Fun Food Friday — Piroshki (Russian: Pirozhki)

Filed under Fun Food Friday, R. Doug Wicker, recipe, Wine & Food

Fun Food Friday — Attempting to duplicate Katz’s pastrami


Pastrami closeup

Today I’m going to reveal my secret to duplicating (as best I can) the incredible pastrami that comes from the incomparable Katz’s Delicatessen. It’s not that difficult to do, and although I’ll be the first to admit Katz’s is still better, I believe this comes as close as you’re going to get short of a trip to New York City.

What you’ll need:

  • Good quality corned beef brisket (don’t skimp here; you get what you pay for)
  • The packets of pickling spices included with those briskets
  • Additional coriander
  • Additional black peppercorns

Pickling seasonings packed with briskets; additional coriander and black peppercorns

Start with a good corned beef

But before we work with the seasonings above, let’s prepare the corned beef briskets. Corned beef straight from the vacuum-sealed pack is rather salty, which is why you boil it. But you don’t want to boil a brisket that you’re going to smoke into pastrami, so forget that. Instead, soak your briskets in cold water for 24 to 48 hours, changing the water several times.

Soak in cold water

Now that the brisket is soaking, let’s get back to those spices. Using a mortar and pestle, or if you don’t have the patience, a spice grinder, crush together the pickling seasonings that came with the brisket along with additional black peppercorns and coriander to pad out the amount of seasoning available.

Mix spices into mortar

Crush spices with pestle or in a spice grinder

Now rub vigorously the spices into the corned beef briskets. Putting a little oil onto the meat while your doing this won’t hurt, either, but it’s not absolutely necessary. Wrap tightly the briskets in plastic wrap and refrigerate overnight.

Rub seasoning into meat; wrap and refrigerate

The next day load up the smoker. Make sure to keep up your water levels to prevent the briskets from drying. Maintain a temperature of 225°F/110°C. What wood? Whatever you like. I used hickory, and that seemed to work just fine. I suspect apple, cherry, or even pecan would also work well. Keep up the smoke for at least three hours into the process, after which you can concentrate on just maintaining water levels.

Loading up the smoker

Now smoke the briskets for at least six hours. When they’re ready to pull out of the smoker they should look something like this:

Six or so hours later

But you’re not done yet! If you’re having the pastrami the next day, allow the briskets to cool and then wrap tightly with plastic wrap and put them in the refrigerator. If you hunger for this for dinner, continue to the next step (which you would instead do the next day if you decided to wait). That next step is to place your briskets onto a rack over a roasting pan, and to place water into the pan below the level of the meat.

Place briskets on a rack over a roasting pan; add water to pan

Tent heavy duty aluminum foil over the roasting pan and rack, making sure that the foil does not come into contact with the meat. Wrap tightly the foil around the edges so as to trap steam from the water in the pan.

Tent tightly with foil and steam in the oven

Steam the smoked briskets in the oven between 250°F/120°C and 275°F/135°C for two to three hours — thicker steams longer; thinner steams less. Take the briskets out of the oven, keeping the meat, rack, and pan tightly wrapped. Allow to cool gradually for at least 30 minutes or so. Remove the foil while taking care to avoid steam burns! Now slice the brisket and thinly as you can.

Slice thinly

Get a nice Jewish rye bread, some mustard, and a good quality Emmenthaler cheese (that’s what we call Swiss with holes), and build your sandwich!

Serve on rye with a good imported Emmenthaler (Swiss cheese)

Normally, this is the point where I give a wine pairing. But, hey, we’re talking pastrami here. That calls for a light ale! If I absolutely had to pair a wine with pastrami, however, I believe I would lean toward a lighter, fruitier red. Here I’m thinking pinot noir, petite syrah, sangiovese/chianti, perhaps even a tempranillo. If I wanted something a bit more robust to compliment the smoke flavor, I might try a zinfandel, but a shiraz would probably be a grape too far.

Comments Off on Fun Food Friday — Attempting to duplicate Katz’s pastrami

Filed under Fun Food Friday, R. Doug Wicker, Wine & Food