(Following is a repost from December 2012, hence the Mayan calendar reference)
It’s the Christmas season. That means it’s camera time, because you won’t see this much nighttime splashing of color again until July 4, and that’s only if we’re all still around come Mayan dawn on December 21 (remember — those west of the International Dateline get it first).
Taking pictures of Christmas lights requires special care and preparation. Regular readers of my blog know that I don’t usually advocate taking the camera out of JPEG and shooting in your camera’s Raw format (especially for beginners or those who haven’t the time to fool with post-processing the conversion), but this may be an exception. The biggest reason for this is White Balance and the transition from incandescent (tungsten) lighting to the newer high-tech LED lights becoming increasingly more common, but more on that in a moment.
Equipment you’ll need: A camera that allows you to control white balance, and preferably one that allows storing images in Raw format for processing later. You’ll also need a good tripod. If you don’t have a tripod, then review my article on Available Light Photography Without a Tripod for tips on how to get around long exposures without camera shake and resulting image blur. A remote camera release makes things easier, but if don’t have one then just use the time-delay feature on your camera so that your finger is off the shutter release button when the picture is taken.
Camera settings: Use the highest ISO your camera can handle without giving you too much noise or too little resolution. The pictures below were taken with a Canon G1 X at ISO 800. That’s pushing it for most cameras smaller than a DSLR, so my may need to set ISO 400 or lower. Use Raw format if your camera has that capability. If it doesn’t, see the White Balance Considerations section below. Set your camera to Evaluative Metering and the shooting mode to Program — today’s cameras can probably judge the exposure much better than can you, so take advantage of that. You can try bracketing the exposure, but if you don’t know what that means then forget I said anything about it.
White Balance Considerations:
- The older style incandescent Christmas lights emit to the eye a rather warm-looking light. Even the white incandescent lights are actually in the yellow to orange range, but your eye automatically corrects for this which is why they appear white. When you set your camera’s white balance to the Tungsten setting (often pictorially indicated by a light bulb), the camera takes this into account and corrects the colors accordingly.
- LED lights have the opposite problem. They emit cooler light biased toward the blue end of the spectrum. Older LED systems are the worst offenders, but even the newer “true white” LEDs are not really that close to neutral (defined as sunlight, or about 5200 Kelvin). Your camera most likely doesn’t have an LED balance. White Fluorescent will get you close, but Raw and manually setting the white balance in post-processing is the real answer to getting the best looking color.
Below are three different white balance settings of the same image. The image itself is rather challenging in that the left-side lights are incandescent and very warm in color, and the right-side LED lights are far into the blue spectrum. The top picture is incandescent balanced using the camera’s default Tungsten setting. Note how blue the LEDs are as a result. The picture on the in the middle was manually balanced by me to neutralize the blue tint of the LEDs. I did this by setting the color temperature to 6800 K (Kelvin). How do I know that this setting is LED-neutral? Check out the now tint-free aluminum foil encasing the fountain. The problem here, however, is that now the incandescent lights are horrendously in the red. Check out the rock wall behind and the cement on the driveway to see what I mean. The trick in post-processing is to find a happy medium, which is represented by the last example set to 4800 K. The blue tint has returned to the foil, and red is slightly in evidence on the light reflected off the wall and driveway to the left, but both are now much closer to acceptable and the colors between these two very dissimilar light sources are much more in harmony as a result. As always, click on an image to view it enlarged:
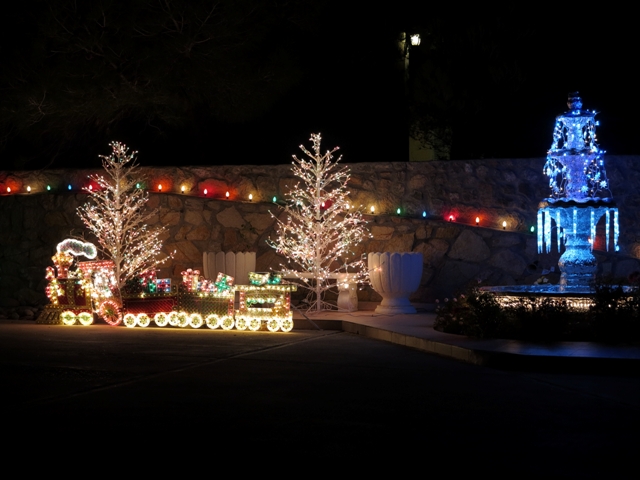
White balance set for tungsten lighting — About 3,200 K

Balanced to neutralize bluish tint for LED — 6,800 K
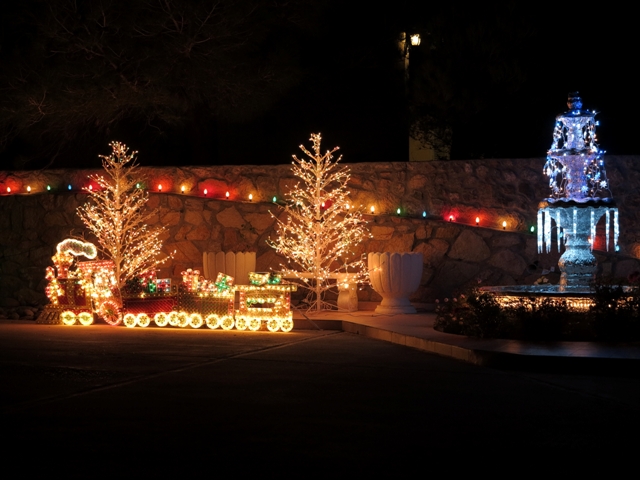
The compromise between tungsten (left) and LED (right) — 4,800 K
Another white balance tip: Sometimes balancing incandescent bulbs to true white appearance doesn’t look quite right. Sometimes, you want a slightly warmer appearance. In these cases, take your pictures with the camera set to Tungsten, but add a little warmth in the color balance later to warm up the lights should they appear too cool. Below is an example of that. The picture at top is technically “balanced,” but it’s rather stark and cold looking. The lower image has been warmed up a bit, and is much more visually appealing. (A note here: ‘Warming’ and ‘cooling’ the color balance is actually counterintuitive, as warming involves decreasing the Kelvin temperature while cooling a scene requires just the opposite.)

Balanced for tungsten, the color rendition is technically correct but too stark a white
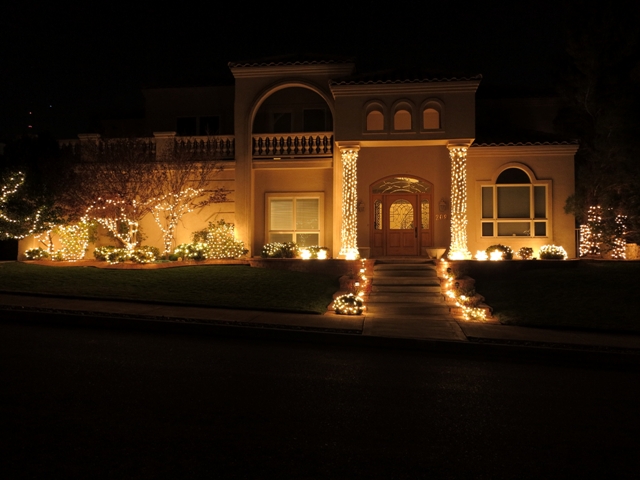
Counterintuitive, but “Warming” the colors actually involves decreasing (cooling) the color temperature
One more tip: Many of the techniques used here for outdoor lights will also work quite well for those indoor Christmas Tree shots. Just make sure you reduce, but not necessarily turn off, other room lighting so as to not distract from the tree lights.
But enough of the technical stuff. Now let’s just enjoy the show from this year’s Christmas lighting displays:


 Decisions — Murder in Paradise
 The Globe — Murder in Luxury