Category Archives: Wine & Food

For Menudo Fans


Ooops.  Wrong “menudo.”  I meant this stuff:

A Bowl of Red

A Bowl of Red

Menudo is one of El Paso’s best kept secrets.  And it’s either really, really good or dismally bad.  There is seldom an in-between with this stuff.  El Paso’s La Malinche serves a very, very good bowl of menudo.

La Malinche

La Malinche

Traditionally, menudo is served on weekends for breakfast, as it purportedly has recuperative powers post-hangover.  I’ve never eaten it for that reason, but both Ursula and I love a good, steaming bowl of it . . . especially on a cold winter morning.  Alas, it’s June and in the triple-digits of late, but on Fathers Day we went anyway.

So, how long have we been going to La Malinche for menudo?  Here’s an indication.  See this woman?

Sandra

Sandra

That’s Sandra.  She’s been serving us for years, and she doesn’t even bother to ask us anymore what we want.  She just motions us to one of the tables in her section; plops down a pitcher of tea and glasses with ice; fetches the onion, green lemon slices, Mexican oregano and crushed chili pepper; and then weaves through the hungry throngs to deliver to us some of the best menudo you will ever eat.

Tea, "Limón," and Onion

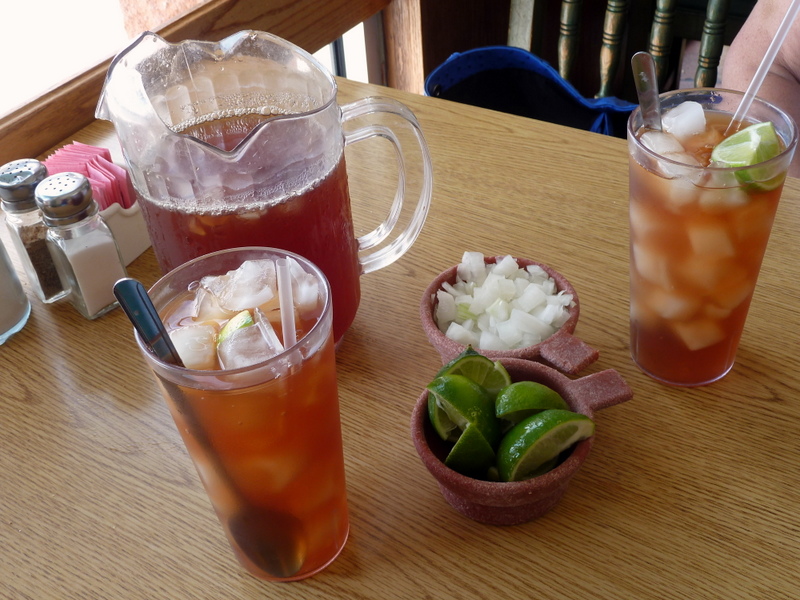
Tea, “Limón,” and Onion

Menudo, Bread, Oregano, and Crushed Peppers

Menudo, Bread, Oregano, and Crushed Peppers

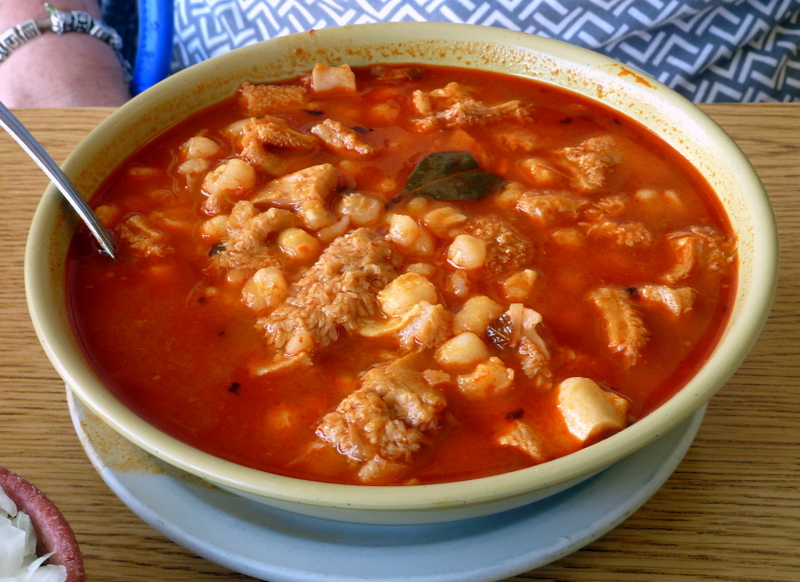
Menudo is a chili-based broth containing posole (Mexican hominy) and chunks of beef tripe (the “menudo” in menudo) that have been simmered for hours until they are marvelously tender.  This is not to be confused is a bowl of “posole,” which substitutes pork for tripe and is not nearly as flavorful.

As with most of the really good Mexican restaurants, La Malinche is a real hole-in-the-wall lacking in both charm and ambiance.  You come here for the food, not the decor.

La Malinche

La Malinche

 But that’s okay.  That’s what really good and authentic Mexican cuisine is all about, and it’s part of the dining experience.

Now, how to properly dress a bowl of menudo:  Here locally menudo is served with bread (either toasted with butter or in whole rolls), green lemon wedges, chopped yellow onion, “Mexican oregano” (course, whole buds of the lippia graveolens plant) , and crushed red chili.  We prefer the whole bread to the toasted so that it can be broken into pieces and floated into the broth to soak it up.  So spoon in some chopped onion, drizzle on some lemon juice, float some of that bread, and sprinkle on some chili pepper and “oregano” (easy on the chili).  As for that “oregano,” we like to rub it vigorously between the palms as we sprinkle it.  As with most herbs, rubbing released both the essence and the flavor.

Do all that and this is what you get:

Menudo Dressed and Ready

Menudo Dressed and Ready

What a great way to wake up to Fathers Day in El Paso, Texas.

4 Comments

Filed under Photography, Wine & Food

Smoked Pork Ribs


Time to continue our series on barbecue lessons.  As you’ll recall, barbequing is distinctly different from grilling, although most people erroneously interchange the two terms.  Grilling involves fairly rapid cooking directly over a heat source (usually a high-heat source).  Barbecue is slow, high-humidity, indirect cooking at very low temperatures over a period of many, many hours.  Barbecue smoking is the use of hardwood chunks or chips to impart a smoky flavor to meats during the barbecue process.  Rubs are used to impart additional flavor to meats during either grilling or barbequing, but are truly effective when applied several days before placing the meat into a smoker.

So far we’ve explored the Smoked Pork Butt using a relatively simple “rub” of just sea salt and pepper.  After some twelve hours or so, here was the result of that blog post:

Smoked Boston Butt, aka, Pork Shoulder

Afterward, we showed how to take that second Boston butt and turn it into delectable Carolina-style Mustard Barbecue Hash:

Carolina-style Mustard Barbecue Hash

From there we took on the more advanced and much more time-consuming project of Smoked Brisket using a more complex rub made from equal amounts of the following (which is what we’ll use today for our ribs):

Paprika, Chili Powder, Kosher Salt, Black Pepper, Brown Sugar

That particular 18-hour project resulted in this little bit of Heaven:

18-Hour Smoked Brisket

So, to day, we’re going to try something that’s both simpler and which requires less time.  That’s the delightful Pork Rib, in this case the Baby Back.

Baby Back Pork Ribs

Baby Back Pork Ribs

Remember that rub you made for the brisket (ingredients pictured above)?  Hope you saved some.  If not, make some more.  Rub that spice mixture into the ribs.

Rubbing the Ribs with Rib Rub

Rubbing the Ribs with Rib Rub

After rubbing the ribs, wrap them individually in plastic wrap and refrigerate for a day or two.

Wrapped Rubbed Ribs

Wrapped Rubbed Ribs

Unlike Boston Butt (12-hour project) or brisket (18-hour project), pork ribs require considerably less time because of their thin size and tendency to dry out of smoked for too long.  Thus, this is about a five-hour project.  So, let’s get started.  Preparation for the smoker for both Boston butt and pork ribs can be found in that blog post at this link:  Smoked Boston Butt.

A word about wood choices:  This being pork, fruit woods such as apple and cherry will work very well.  Hickory and pecan will also give the ribs a great flavor, with hickory being the more traditional of the two.  Stay away from mesquite, which is more at home with beef and better suited for quick grilling.  You’ll probably find mesquite far too overpowering for barbecued pork.

Take your ribs out of the refrigerator and unwrap them.  Then cut them in half so as to fit into some rib racks (only necessary if you’re going to smoke a considerable amount and need to place them edgewise, otherwise don’t bother to divide the ribs).

Rubbed Ribs in Rib Racks

Rubbed Ribs in Rib Racks

Check your water level after about 2½ hours.  As for the wood chips/chunks, you can discontinue with replenishing them after the first batch of chips/chunks as long as you got at least ninety minutes to two hours worth of smoke out of them.  Any more than that will result in too much smoke flavor, imparting a bitterness to the meat that you’ll want to avoid.  As always, put into the smoking box only enough wood to produce a barely visible stream of smoke coming out of the upper vent of the smoking chamber.

Barely Visible Smoke

After five hours here’s what you’ll get, perfectly seasoned and smoked pork ribs:

Finished Smoked Ribs

Finished Smoked Ribs

From this point you can go one of two ways:  First, you can serve the fresh from the smoker relying solely upon that rub and the smoky flavor (i.e., “naked”):

Ribs and Swiss-style Potato Salad

“Naked” Rubbed Ribs with Swiss-style Potato Salad

Or, you can sparingly brush on some barbecue sauce and “burn” it into the meat either using a grill or underneath your oven broiler.  Be careful using the second option — you want to dry out the sauce and slightly caramelize it without drying out the ribs or blackening the sauce.  My recommendation is to serve the freshly smoked ribs naked, and sauce the rest when you serve them as leftovers.  Burning into the leftovers some barbecue sauce is a great way to reheat the ribs without drying them out, and the sauce helps disguise that “reheated pork” taste.  If, on the other hand, you want to retain that great original flavor, the best way to reheat them so as to avoid that “reheated pork” taste is to place the ribs on a rack and into a roasting pan containing a shallow amount of water, tightly sealing the pan with heavy-duty foil (carefully tenting the foil so as to avoid having it touch the meat), and slowly oven-heating the ribs at low temperature (around 220° Fahrenheit/105° Celsius) for about an hour to ninety minutes.

Wine selection:  This is barbecue.  It is — by definition and through the presence of all that black pepper and chili powder — spicy.  That hints at the customary wine for both barbecue and grilling.  Try a peppery shiraz from Australia, preferably one from the Barossa Valley.  Other good choices include Châteauneuf-du-Pape or the Australian GSM (Grenache, Shiraz, Mourvèdre) equivalent.  Argentine Malbec would also work well with this style of cooking.

5 Comments

Filed under Wine & Food

Smoked Brisket


Apparently there are a lot of people out there who are interested in the art of smoking meats, if my hits for Smoked Boston Butt and Mustard-Based Barbecue Hash are any indications.  Today, I’ll teach you the secrets behind irresistibly delectable smoked brisket. Brisket is probably the most challenging barbecue subject you’ll find.  In it’s normal state a brisket is tough, fatty, not very flavorful.  In short, it needs help.  A lot of help.  That help arrives in the form of slow, slow roasting at low, low temperatures, the tangy caress of hardwood smoke, and a flavorful rub consisting of a carefully balanced blend of complimentary seasonings.  But this truly is a long-term project requiring about 1 ½ to 2 hours of smoking for every pound of meat, or around eighteen hours for a typical nine-pound brisket. The first secret is that you want an untrimmed brisket.  Brisket is by nature a very tough piece of meat, and you’re going to need the fat of an untrimmed one to both tenderize it and to transfer deeply into the meat the flavors of the rub you put on it, and the delicate smokey flavor imparted by your smoker.  Just trim away a little of the fat cap — down to around a quarter- to half-inch thick along the top of the brisket.

Untrimmed Brisket with some of the fat cap removed

Untrimmed Brisket with some of the fat cap removed

Next comes the rub.  You’ll find a lot of different rub recipes on the internet, but this one is neither overpowering nor does it conflict with the delicate smoke of the barbecue pit.  It consists of equal measures of just five ingredients:

All You Need for Rub

All You Need for Rub

  • Brown sugar
  • Kosher salt (halve the amount if using fine-grain or table salt)
  • Freshly ground black pepper
  • A high-quality paprika
  • A good, unadulterated chili powder (preferably a New Mexico mild red); by “unadulterated,” I mean nothing added to the chili powder whatsoever

Mix together the rub ingredients.  Sprinkle a generous portion of the rub onto the entire exterior of the brisket.  Work the rub into the meat.  Sprinkle on more rub, and then tightly encase the entire seasoned brisket in plastic wrap.  Refrigerate the seasoned brisket for at least twenty-four hours.

The Rubbed Meat

The Rubbed Meat

Wrapped and Refrigerated for at least 24 hours

Wrapped and Refrigerated for at least 24 hours

Prepare your smoker as we did for Smoked Boston Butt, filing the water tray and placing either hardwood chunks or water soaked hardwood chips into the smoke box.  Good wood choices here include hickory, oak, and pecan, or a combination of any or all of those woods.  Mesquite can be used, but sparingly.  If you like the flavor of mesquite, make sure you dilute that sharp mesquite tang by using two to three parts of the other listed wood for every part of mesquite or you’ll run the danger of overpowering the meat and imparting to the brisket a bitter, over-smoked taste.

Adding Water to the Smoker Water Tray

Loading in the Soaked Wood Chips

Just before you go to bed on the night before your brisket dinner, place your brisket into the smoker and adjust the temperature to 215°  Fahrenheit (102° Celsius).  Check water and wood smoke levels about every three hours (And you thought this was going to be easy?  No way!  Get out of bed and check that smoker!).  The next morning you can now forgo adding any more wood.  By now the smoke has done all it’s going to do for the flavoring of the brisket.  From this point on you’re now concentrating on liquifying the internal fat so that it carries the rub and the smoke flavor from the outer layers of the brisket deep into the meat.

Into the Smoker

Into the Smoker

As with Boston butt, the internal temperature for which we are shooting is 185° (85º C) or higher, as we want the internal temperature to continue to rise to 190° (88° C) after the brisket is removed from the smoker and resting.  At the sixteen-hour mark we can safely speed up this process because by now the internal fat should be liquified.  Make sure the water tray is topped off and crank up the smoker heat to around 250° (120° C).  Some people advocate tightly wrapping their brisket in heavy-duty aluminum foil during the latter stages and placing it back into the smoker to finish off.  Don’t do it!  Have you ever seen what happens to aluminum foil when it comes into contact with salt for any length of time?  Yuck.  No way I want that black oxidized aluminum embedded onto my brisket, and neither should you.  If these foil advocates are getting dry brisket, it’s because they’re not properly maintaining the humidity levels inside the smoker via that water tray.

Almost Done — Time to Finish in the Smoker or Oven

Almost Done — Time to Finish in the Smoker or Oven

Another method to speed things along is to take out the brisket, place it on a wire rack into a roasting pan containing a little water (just enough to keep it humid — about half a cup should do), carefully tent the pan with heavy duty foil while making sure that the foil does not touch the meat, and then tightly sealing the foil around the edges of the roasting pan.  Place the roasting pan into the kitchen oven and roast the brisket at between 250° to 275° (120° to 135° C) for about one to two hours.

Brisket Tent Coming out of the Oven

Brisket Tent Coming out of the Oven

After you hit that magic internal temperature number, remove the brisket from the smoker or oven and allow it to rest for at least half an hour.  As we did with that Boston butt, we’re allowing the flavorful fats to once again congeal and lock in the moisture inside the brisket.  Carved too soon, that fat and moisture will ooze out and leave you with a dry brisket. And, yes, there’s one more secret.  That would be the secret to carving the brisket.  You’ll notice two basic parts to your brisket.  On top of the brisket will be a fattier meat with the grain of the meat running at a diagonal to the length of the brisket.  Below that will be a leaner portion in which the grain runs in a slightly different direction.  Slice into the brisket horizontally to remove the fatty portion and set that off to the side (the added fat makes this the logical portion to save as leftovers, or to carve last if you’re feeding a mob).  Now, using a long and very sharp kitchen knife (under consideration for banning in the U.K. since the gun ban didn’t quell violent crime there), slice the brisket directly across the grain for maximum tenderness.  Slices should be at least a third of an inch thick — too thin and the slices will fall apart; too thick and they may be a bit chewy.

The Final Product

The Final Product

Wine selection:  Again, this is barbecue.  Australian Shiraz is a natural.  But it’s also beef, so other nice pairings include a Bordeaux-style blend heavy on the Cabernet Sauvignon grape; an aged, dark red California Zinfandel; or even an Australian GSM or the French equivalent Châteauneuf-du-Pape.

2 Comments

Filed under Wine & Food