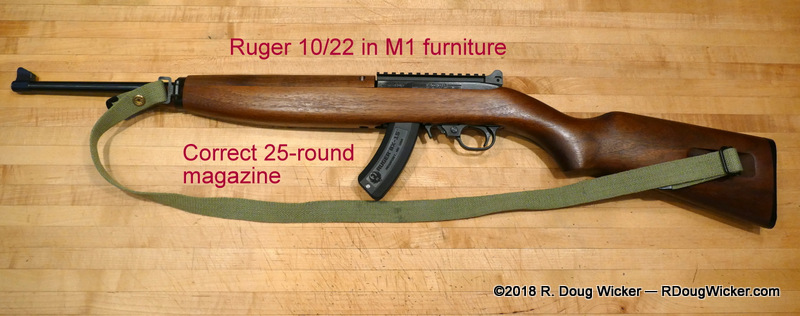
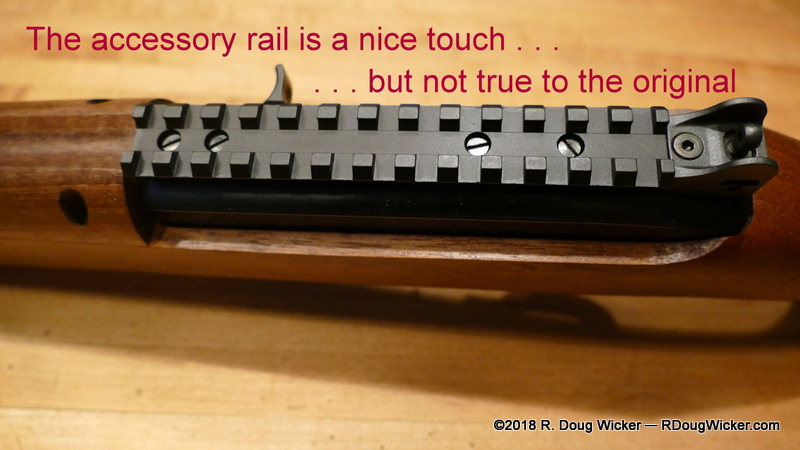
If you took a quick glance before answering, you probably said, “That’s a .30 M1 Carbine.” You’d be wrong. I placed that rifle atop an M1 Carbine magazine just to throw you off. Here’s that same rifle, with the sling lowered to reveal an accessory rail, next to Inland’s new .30 M1 Carbine (see: Firing Review — The new Inland .30 M1 Carbine):
Ruger 10/22 “M1 Carbine”
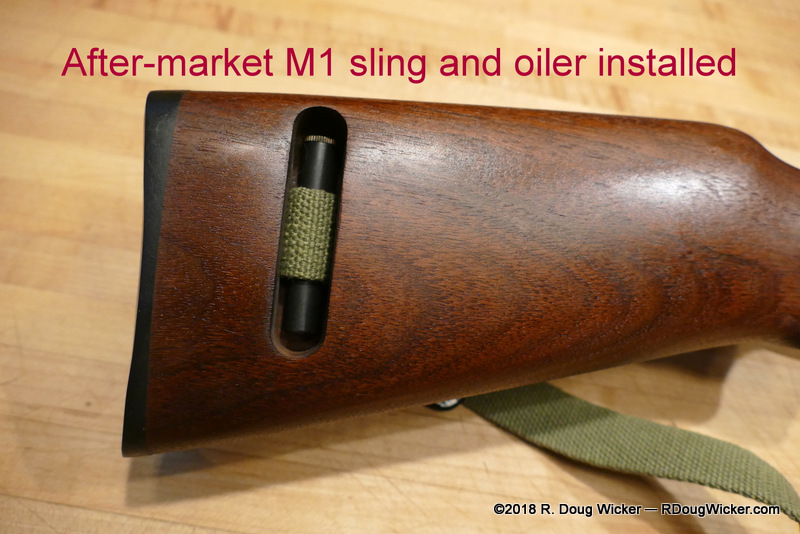
This is aRuger 10/22 Carbine, which is a standard 10/22 receiver with an 18.5-inch/47-centimeter barrel residing in a walnut stock patterned after the M1 Carbine stock, clear down to the oiler slot for a sling.
Ruger 10/22 “M1 Carbine”
Other M1 Carbine touches include a peep sight (not as good as the original) and a front sight with protective ears.
Ruger 10/22 “M1 Carbine”
Ruger 10/22 “M1 Carbine”
Unfortunately, the weak point in this M1 Carbine tribute is the front swivel and barrel band. Unlike the original, where the swivel is attached directly to the band and the tightening screw is independent of the swivel, on the Ruger the screw functions to both tighten the band and hold the swivel. Tighten the screw too much and the swivel freezes up. Back off the screw too much and the band becomes too loose. It’s definitely a flaw in an otherwise fun concept.
Ruger 10/22 “M1 Carbine”
While that’s not a minor quibble, in my view, it’s not enough to take the fun out of Fun Firearm Friday. This 10/22 weighs in at 5.2 pounds/2.4 kilograms. The original M1 Carbine upon which this rifle is visually base weighs . . . wait for it . . . 5.2 pounds/2.4 kilograms. That makes the Ruger a very practical rifle for hiking — light, relatively small, easy to maneuver, and if it’s anything like any other 10/22 I’ve ever fired, fun to shoot. It also comes with a 25-round magazine.
Ruger 10/22 “M1 Carbine”
The Ruger 10/22 Carbine will also accept other 10/22 magazines, including the more typical 10-round rotary magazine that fits entirely into the magazine well. As for the sling and oiler, you’ll have to order that separately. Any sling/oiler combination made for the .30 M1 Carbine should work in the 10/22 Carbine.
Ruger 10/22 “M1 Carbine”
Ruger 10/22 “M1 Carbine”
The accessory rail does detract from the ambience, but not too much. And it does provide you with the option to add optics ranging from a simple red dot to a magnified scope.
Ruger 10/22 “M1 Carbine”
I’m really looking forward to taking this rifle to the range. Perhaps I’ll even fire it alongside the Inland. At any rate, it’s a good companion piece to the Inland in a cheaper caliber.
What is 300 AAC Blackout ammunition? First, a little history. In 1962 the U.S. Army began deploying as their primary weapon the M16 chambered in NATO 5.56x45mm, which is for all practical purposes an extremely hyped-up .22 caliber round (.223 to be exact) that packs a lot of punch out of the M16’s original 20-inch/508mm barrel. When the Army found that most engagements were inside of 100 yards/92 meters, and many modern battlefield engagements are in an urban setting, the Army opted to reduce the M16’s barrel length to something more suitable to what they were encountering. The result is the M4, a descendant of the M16 with a shorter 14.5inch/370mm barrel.
Problem is that loss of 5.5 inches/128mm adversely impacts the effectiveness of the 5.56 round. Not a lot, but enough. Then there’s the inability to properly suppress a supersonic round, which is something our Special Forces like to do on occasion.
This limitation and others led Advanced Armament Corporation to look at the existing M4 and see if they could come up with something a bit better. What AAC came up with is probably the most versatile round ever produced — the 300 AAC Blackout. The 300 BLK, as it is more commonly known, comes in everything from a 110-grain/7.13-gram supersonic round to a 220-grain/14.26-gram subsonic round with perhaps dozens of intermediate loads available in between these two extremes.
But the advantages don’t stop there. The 300 BLK can use the existing M16/M4 lower and M16/M4 magazines with only a simple swap out of the upper. Additionally, the 300 BLK offers better performance out of a 9-inch/229mm barrel than the 5.56 can achieve out of the M4’s 14.5-inch/370mm barrel.
How does all this translate to the civilian world? It means you have a weapon that is suitable for everything from medium game hunting, to plinking, to serious target practice at intermediate distances, to home defense with suppressor capability all in one convenient package. That’s pretty versatile indeed.
All this versatility also means that U.S. forces can switch from longer-range supersonic rounds to suppressed subsonic rounds merely by attaching a suppressor to the end of the barrel and swapping out the ammunition in their magazines.
Threaded Barrel and Flash Suppressor
Beyond military applications and up until the release of this new Mini-14 the 300 AAC Blackout has been mostly aimed at the existing civilian AR market (civilian semiautomatic versions of the M16/M4 platform). Not anymore. Now for the first time it can be used in the proven and arguably more reliable Garand-style action of the Mini-14. But if you’re looking for reliability, read on for my review of the worst ammunition I have ever encountered — Remington’s UMC 120-gr OTFB (Open-Tip, Flat-Based) 300 AAC Blackout supersonic ammunition.
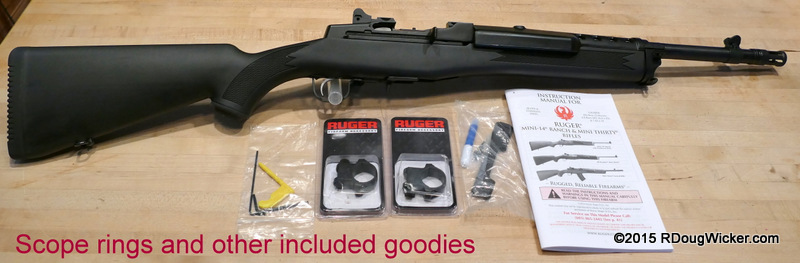
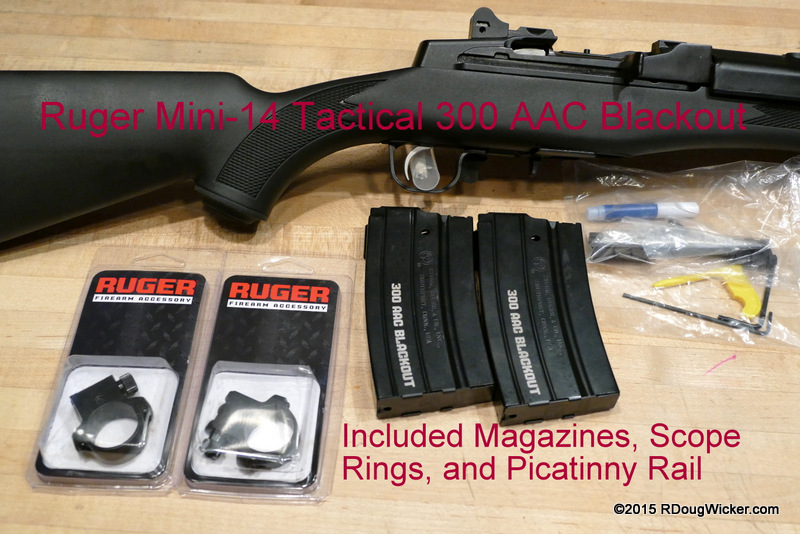
Just some of what’s in the box:
Two 20-round 300 AAC BLK magazines (Unlike the AR market, Ruger has chosen to make their Mini-14 300 AAC BLK incompatible with existing Ruger .223/5.56mm magazines to prevent potentially catastrophic cross-loading of ammunition) (UPDATE: Thanks to the guys over at RugerForum.com, and contrary to information posted on the ShopRuger website, I’ve since discovered that this is incorrect. The magazines are indeed compatible. Apparently Ruger claim otherwise in order to preclude customers from loading wrong caliber ammunition between differently chambered Mini-14s.)
Scope rings
Picatinny rail
Suppressor-ready threaded barrel with flash suppressor installed
Hex wench for iron sight adjustments
Lubricant
Safety lock
What’s in the Box
Close-up of Accessories
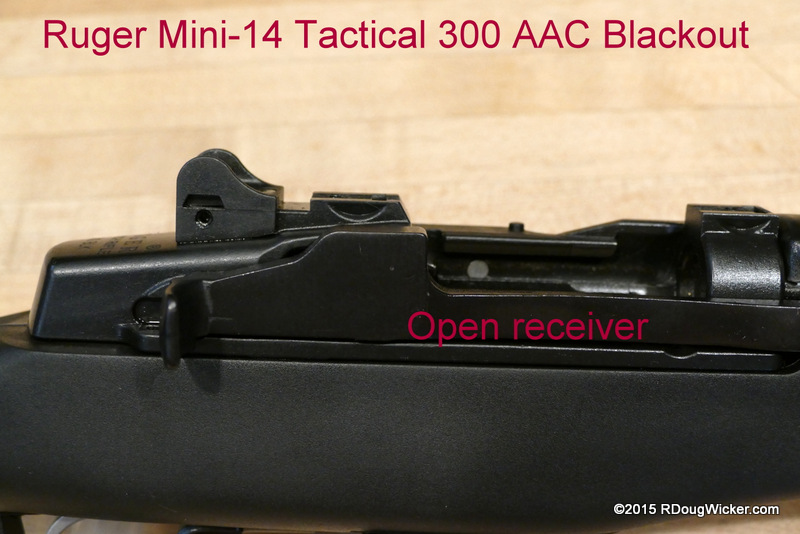
How does it shoot? When the ammunition works, pretty darned good. Out of the box and with no adjustment of the sights. I was able to score fairly tight groupings within around six to eight inches of the intended point of impact at an estimated range of about 60 feet/18 meters. (UPDATE: Bear in mind that I was testing here for function rather than accuracy. This grouping was done with the included iron sights, straight from the box, rather than a scope. Additionally, the rifle was not benched for accuracy. In my future in-depth review, I suspect groupings should fall well within two-inches at 100 yards, but this has not yet been confirmed.) Recoil is surprisingly light. Recovery and reacquisition of the target was quick and effortless. The trigger is good, but somewhat shy of great. The trigger is definitely better than on a Beretta CX4 9mm carbine, but this is a longer range weapon so that should be a given. The manual safety is easy to reach and to manipulate with the trigger finger, but deactivation does require insertion of the trigger finger into the trigger guard — make certain the weapon is pointed in a safe direction and on target before deactivating it. The installed iron sights have protective ears for both the front blade and the rear aperture. Sight adjustments are available for both windage and elevation using the included hex wrench.
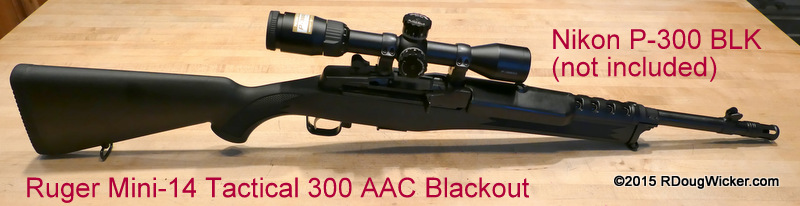
Ruger Mini-14 300 AAC Blackout with Nikon P300 BLK
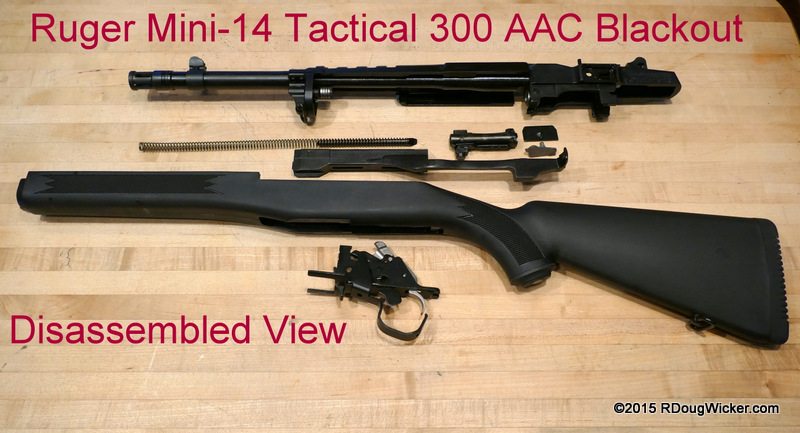
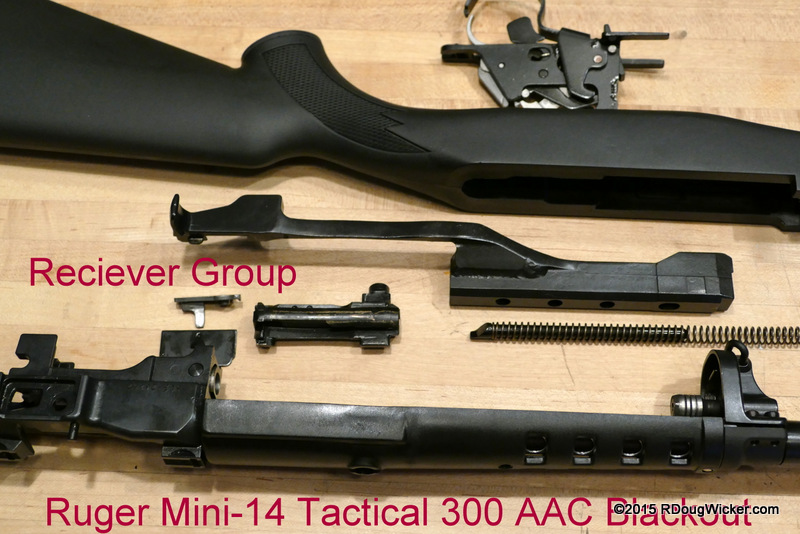
Disassembly, cleaning, and reassembly is fairly straightforward. It’s certainly much simpler than, say, an M1911A1, but not as simple as most modern handguns. All you need is a ¼-inch punch to break down the rifle, and Ruger has put up videos on YouTube to walk you through it all.
Ruger Mini-14 300 AAC Blackout disassembled
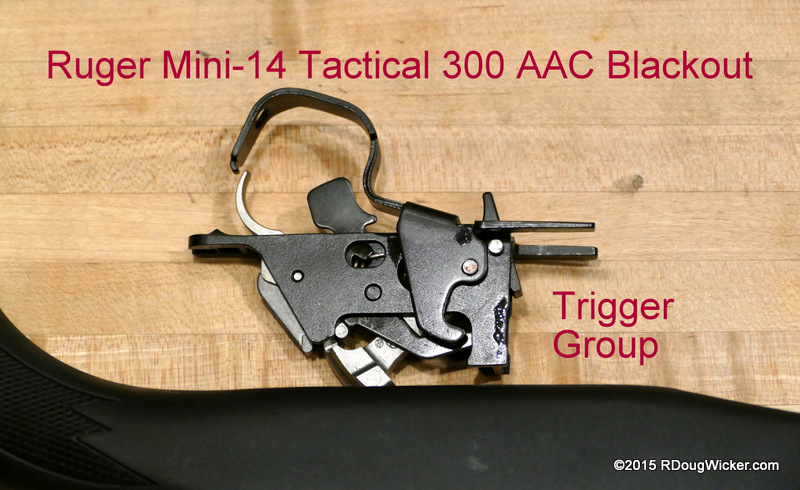
Mini-14 Trigger Group
Mini-14 Receiver Group
A quick word about the Garand-style gas operating system of the Ruger Mini-14 300 AAC Blackout: This system has been carefully tuned at the factory to handle unsuppressed supersonic loads and suppressed subsonic loads. Further adjustments not possible at home, and unnecessary at any rate as long as you remember to run suppressed with subsonic ammunition or unsuppressed with supersonic loads. Failure to follow this basic advice may result in unreliable ammunition feeds into the rifle. As I don’t (yet) have a suppressor, I cannot validate for you the reliability of the Mini-14 300 AAC Blackout using subsonic loads.
Rotating Bolt
Ruger Mini-14 300 AAC Blackout
Now for the ammunition. The first box of supersonic Remington UMC 120-gr OTFB 300 AAC Blackout ran without drama when inserted ten rounds at a time into one of the included 20-round magazines. After my good friend David Williams and I fired ten rounds each I then loaded up the same magazine with a full twenty rounds.
Result: Repeated blown primers resulting in jamming of the weapon. Never in my entire shooting life have I ever had so much as even one blown primer, so it took me a while to realize what was going on, but in twenty rounds I had somewhere in the vicinity of five primers blow out of their respective casings. Later disassembly of the rifle for cleaning and inspection revealed no damage to the rotating block and firing pin, but Remington definitely got an earful on their ammunition and the remaining two boxes will be returned for evaluation. The lot number, for anyone interested, was A333-7 0360-1, but from my experience I’m not going to trust any Remington 300 AAC Blackout ammunition regardless of lot number. (UPDATE: Remington claim that their ammunition was not at fault here, and instructed me that the blown primers indicated a problem with the rifle. I will report back on this in a future in-depth review, but right now I’m more inclined to suspect bad ammunition rather than the rifle, as I can find no reports of similar incidents with other Mini-14 Blackouts.)
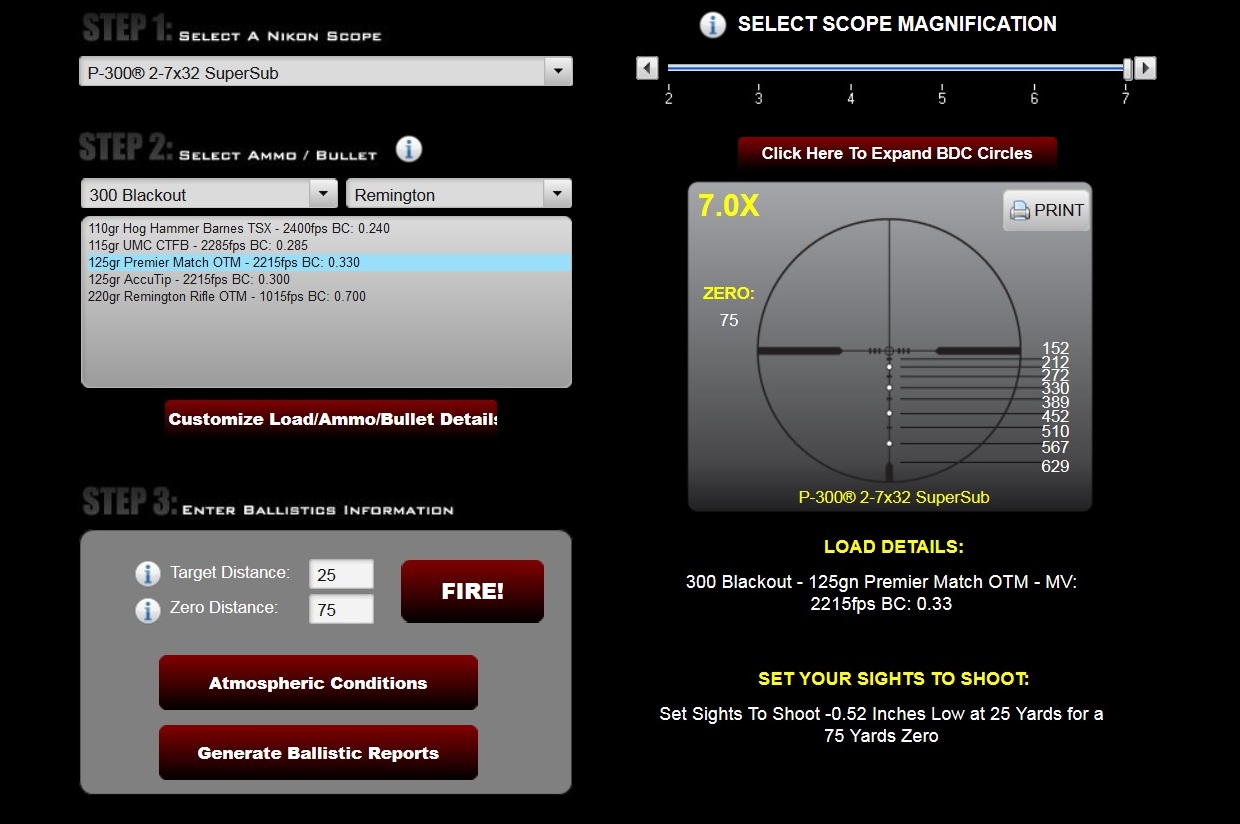
Unfortunately my Nikon P-300 BLK rifle scope did not arrive in time to make this first outing. This is a 2-7x32mm scope with a BDC (Bullet Drop Compensating) reticle optimized for both supersonic and subsonic BLK 300 rounds. Nikon supplies online a nifty Spot-On Ballistics Match Technology that allows you to select the scope magnification (2x to 7x for the P-300) ammunition brand and load, and then supply you with the bullet drop compensation figures for each point contained in the scope reticle. Once you’ve established these parameters, you can then make a print-out to take with you into the field. Here’s the reticle sighting data for Remington 125-gr Premier Match OTM 300 AAC Blackout ammunition at a range of 25 yards, zero-in range of 75 yards, with the P-300 set to 7x (you’ll note that 450 yards is entirely within range of this load, and 600 yards is not out of the question):
Nikon Spot-On BDC Technology
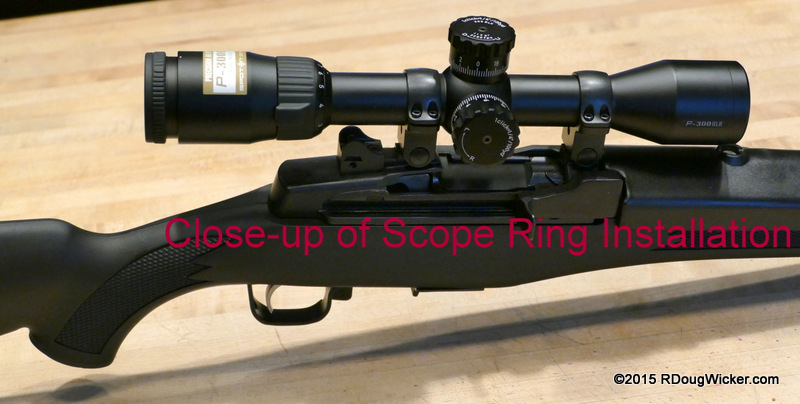
Installation of the P-300 BLK using the scope rings included with the Mini-14 was fairly simple and straight forward. I did figure out one nifty trick, however. First attach only the front scope ring to the P-300, but don’t tighten the top of the ring just yet. Next place the scope ring on a flat surface. Use a small level and check for level by placing it horizontally across the windage adjustment turret, turn the scope until level is achieved, and tighten down the top ring. Now install the rear scope ring onto the Mini-14, then position the front ring/scope assembly. Place the rear top scope ring in place and tighten down. This was much easier than following the Ruger instructions for scope mounting, and it assured that the reticle would be perfectly level once the scope was installed.
Nikon P300 BLK
Nikon P300 BLK
I will evaluate this Mini-14/Nikon P-300 combination at some point in the future, probably after I’ve found a good ammunition for the rifle. Until then, I hope you enjoyed this first look at the Mini-14 300 AAC Blackout.
Addition: I was unable to get decent video on the above firing outing of the Mini-14 300 AAC Blackout in action. I’ll do that in my future in-depth review now that I’ve acquired some SIG 124-grain Supersonic 300 Blackout Elite Performance ammunition. Until then I’m linking below to a brief video supplied by the gentlemen over at Tactical Life, who are preparing their own review of the Mini-14 300 AAC Blackout. Enjoy.
Every handgun owner should have one—a .22 caliber target pistol. The ammunition is cheap, making gun practice affordable. The recoil is considerably less than defensive calibers. Less recoil means you can better see if you’re flinching as you pull the trigger, and that makes for better control and greater accuracy later on when you shoot the big stuff.
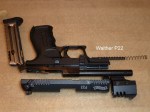
I’ve owned a Walther P22 target pistol for several years now, and it makes a really great training weapon. It has a single-action/double-action trigger, an ambidextrous external safety that operates in the same direction as older Walther models, and a grip similar to more modern Walther products such as the P99 and the newer PPQ. The ambidextrous magazine release built into the trigger guard further emulates current Walther designs, although the levers are much smaller and therefore more difficult to manipulate than on Walther’s full-size weapons.
The Walther P22 also offers adjustable sights for long-distance target practice and replaceable grip back straps to customize how the butt of the weapon fits in your hand. The P22 is currently in its second iteration, now more closely resembling Walther’s PPQ. The version I own is much closer in appearance to the P99.
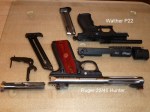
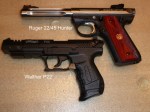
Many years ago I owned a Ruger Mark II target pistol and had fond memories of it. So, when I recently drooled over a newer Ruger Mark III 22/45 Hunter with polymer frame, fluted stainless barrel, fiber-optic front sight, adjustable rear sight, and a grip modeled after the famous Colt Model 1911, Ursula whipped out her credit card and insisted I acquire it. The Ruger’s value as a training weapon is a bit more limited; while the Mark III has an external safety, it looks and feels differently than on most similarly equipped weapons. The Ruger also has a straight single-action trigger—great for target practice, less so for defensive gun training, especially if you own a more traditional double-action/single-action weapon.
But being first and foremost a true target pistol, the Ruger 22/45 Hunter is outstanding in this application. The longer sight-radius and high-visibility fiber-optic front sight makes it a dream to aim. The more massive barrel gives the shooter a steadier hand and better controls what little recoil the .22 LR cartridge imparts.
I put these two weapons to a head-to-head test at an indoor range this past Saturday. My good friend Keith McKay brought along his Browning Buck Mark target pistol as well.
I set the target at my normal practice distance of 21 feet (6.4 meters) and tried the P22 first. Having much more experience with the Walther, I expected to out-shoot the Ruger at least initially, and the grouping of my first twenty shots was not bad—a ragged, more or less circular pattern approximately six inches across.
Next up was the 22/45. If I had any thoughts about being better with the Walther, they were quickly dispelled when I retrieved the target. With no adjustment of the sights and absolutely no experience at firing the weapon, I achieved a much tighter grouping (less than four inches across), better accuracy, and I experienced better recoil control and faster times reacquiring the target. There simply was no comparison on this test. The Ruger 22/45 was much better as a target weapon.
Keith gave both weapons a try and his results mirrored my own. This was especially instructive in that Keith had much less experience with the P22, having only fired it once before, and that was many months ago. Thus, Keith was for all practical purposes firing two unfamiliar weapons while still scoring better with the Ruger.
Interestingly, the Browning Buck Mark bested both of the weapons I was testing, but it did not beat out the Ruger by much and I found the hair-trigger of the Buck Mark a bit disquieting. Indeed, the first time I fired the Buck Mark, after having just fired both the 22/45 and the P22, the trigger broke well before I was expecting.
As a target pistol, the Ruger has it all over the Walther. It’s more accurate, easier to aim, displays less recoil, and is faster getting back on target for followup shots. Alas, all is not peaches and cream with Ruger’s Mark III design, however. I remembered that my older Mark II was a bit of a pain to reassemble. Well, Ruger took a bad reassembly procedure and managed to somehow make it infinitely worse. Part of this I attribute to the magazine safety, which requires a magazine to be inserted into the weapon in order to manipulate the trigger and thus the internal hammer. As the hammer has to be uncocked for some portions of the disassembly/reassembly and cocked for other portions, this means you’re frequently inserting and removing the magazine as you struggle to get the weapon back together.
Compounding this idiocy is one of the worst owners manuals I’ve ever encountered. The instructions for disassembly and reassembly are overly complex, counter-intuitive, apparently contradictory, and difficult to perform. How bad is it? This bad—Ruger states in the owners manual that you can watch a video on how to take the 22/45 apart and put it back together by going to their website at www.ruger.com. Go to that web address and see if you can locate it. Ruger couldn’t even make finding the video easy, and that’s just colossally stupid after you’ve just sent a frustrated customer there.
So, it was off to the internet to see other videos put together by YouTubers who kept telling me how simple it really is. Here’s a clue, guys—if it was really that simple, you wouldn’t be producing a video on how to do it and those videos wouldn’t be getting the hits they’re getting. Don’t insult your potential audience by making claims everybody knows to be false just by the mere fact you’re making a video on how to do it.
As you can tell, those smug and self-serving videos telling me how easy reassembly of the Mark III is were of little help, so I started searching for written instructions. That’s when I stumbled upon this simple, eight-step disassembly/22-step reassembly procedure. Now, come on, Ruger, was that so hard? If it was, hire this guy to write your manuals for you. It’ll be money well spent.
Note: One quick point about the Browning Buck Mark—according to the owners manual for that weapon, there is no authorized procedure for taking it apart for cleaning and lubrication. That alone puts the Buck Mark on my do-not-purchase list no matter how good it is. Sorry, Buck Mark fans.
A word about functionality—The Walther P22 can be converted from a five-inch target pistol to a standard configuration model with a 3.42-inch barrel by removing the compensator and installing a separately purchased shorter barrel. Can’t do that with the Ruger.
And the Winner is:
Walther P22 for handgun training
Ruger 22/45 Hunter for target shooting in every regard (aiming, accuracy, recoil management, followup shots, etc.)
Walther P22 for ease of maintenance
Walther P22 for functionality (with optional barrel conversion kit)
If you’re looking for a straight target pistol, however, don’t underestimate the frustration level when attempting to reassemble the 22/45. Spending an hour struggling to get your pistol back together after cleaning and lubrication will totally negate any sense of satisfaction you may have had a short while earlier on the range. Trust me on this.


 Decisions — Murder in Paradise
 The Globe — Murder in Luxury